Chalk Paint™ Questions and hopefully……Answers
What is Chalk Paint™ Decorative Paint by Annie Sloan?
Chalk Paint™ is an incredible product specifically designed for furniture, and it can be used on walls and in painting leather couches, vinyl chairs, outside of tubs, refrigerators, and exterior surfaces such as doors and shudders (like on The Purple Painted Lady’s Palmyra store.). It is a water soluble paint (meaning a major component of Chalk Paint™) is water. So, when you think of a product being GREEN…think Chalk Paint™ Decorative Paint by Annie Sloan!
Chalk Paint™ by Annie Sloan is also highly pigmented material that is made with little or no black. This is excellent when mixing colors since the end result will be true to hue and not muddy. Annie created it to produce an old-world, European look- but Chalk Paint™ has so much more versatility!
I don’t want my piece to be primitive or distressed- so I guess Chalk Paint™ is not for me.
Oh my- that is far from the truth! Chalk Paint™ is not a one dimensional paint! You can create many types of finishes and the paint has an incredible about of functionality within one quart. Want to create a textured surface? No problem. Want to create a super smooth surface? No problem. Want to sand your piece and get that shabby – French Country feel? No problem. But oh- you want to create a piece that will look perfectly cohesive in your modern home? NO PROBLEM! Chalk Paint™ is perfect also when you want to add depth and character versus just a plastic feeling, one dimensional surface. And it can be used to accommodate any design decor ranging from Mid-Century Modern, Contemporary to french Country, to Primitive. Your color choices and preference of how you “finish” your piece will influence what design style it will be.
Annie Sloan – being a fine artist herself, created her Chalk Paint™ based on her knowledge of paint, pigments and art history. Annie created Chalk Paint™ over 20 years ago, and in the last two decades, her Chalk Paint™ has been pushed and tested beyond probably what either you or I could imagine! So, when it comes to feeling secure in your decision to use Chalk Paint™ – know that you are not a beta test!
As for when it became available here in the US, although the paint was created over 20 years ago- it was around 2010 when Lisa Rickert – who is the proprietress of Annie Sloan Unfolded imported to use on her home in New Orleans.
What are the qualities that make Chalk Paint™ superior?
With Chalk Paint™ there is:
No Stripping
No Sanding
No Priming
and I often add……No kidding!
When you paint with latex paint – you must strip, sand and always prime! That requires a significant amount of your time and money when it comes to buying the materials to do this. Chalk Paint™ by Annie Sloan allows you to create a beautiful finished piece without doing all the extra work of stripping, sanding, and priming prior to painting and without sacrificing the quality. In fact- you are using a product that rivals any high end finish- and in fact- will be superior to it! The colors are beautiful, and are inspired from 18th Century European furniture. Chalk Paint™ is water soluble and has extremely low VOC’s. Due to this – it is considered a “kind” paint by Annie and virtually has no odor to it. One of The Purple Painted Lady’s Retail Partners, Blue Sky Design in Buffalo, NY only sells green building materials. And Blue Sky Design has chosen to include Chalk Paint™ by Annie Sloan to their suite of products! It is safe for you and the environment. <br
Ok- it states above “No Stripping, No Sanding or Priming” but you don’t believe it!
If you read this page from the beginning you realize- that I already stated this! But whenever I am doing a Home Show or festival- I will repeat this mantra over and over again. Only to have someone then immediately ask after listening, “so do I have to sand?” I know that this concept is difficult to believe- but the proof is in the pudding. So, YES!!!! Chalk Paint™ was designed to be very easy to use and it adheres to almost any surface including wood, concrete, walls, leather coaches, vinyl, washer & dryers, porcelain bathtubs …so just about anything! It can be used both outside and in. (But remember when using it for outdoor applications do NOT use wax.
Also, something amazing about Chalk Paint™- is that it provides 50% more coverage in regards to square feet of painting compared to latex.
Wax Top Coat? Why would I use wax versus polyurethane?
Chalk Paint™ is very porous and the wax will penetrate the paint and literally fuse with it making it very strong. Waxing the paint provides protection. Chalk Paint™ in nature- is a very flat chalky finish and over time could be effected by oils from your skin, stains from beverages, dirty fingertips. They can permanently stain the paint. The wax finish is what seals and protects your piece. This is a bit of a crude analogy, but if you have ever replaced the commode (toilet) in your bathroom, before placing the new commode down on the top of the sewer pipe, a thick wax ring is placed. And then, the commode goes on top of that and pressure is applied to “squish” the wax and seal it. Wax is used in many applications to protect materials. A perfect example of this is when we wax our cars.
Why should I use Annie Sloan waxes?
First off, Annie Sloan developed her waxes specifically for her Chalk Paint™ line. The wax is very smooth, like soft margarine or if you are in the south- Crisco! It is easy to use and contains very little odor. It does not contain harsh chemical solvents like quick drying agents so you are not breathing harsh chemicals into your lungs. Also, we have actually heard of other brands of waxes that have removed the paint right off the piece and can stain the paint. Annie Sloan waxes are guaranteed to work with her Chalk Paint™. And guess what- if later in life- you want to change the color of your piece- Chalk Paint™ by Annie Sloan goes directly over Annie Sloan Wax without sanding or priming!
I have never used wax before, how do I use it? Keep reading this post but also watch my video by clicking HERE!
If you are new to waxes, it does take a little bit of getting used to, but it really is easy. The most common mistake people make is to use too much. ? If all you take away from what I say and do is this…you will be ok! SO….take note …we are not icing a cake! We are waxing furniture. So, very thin – uniform coats are best. If that is all that you remember from this hand out- you should be ok! Just like when you put moisturizer on your skin- you do not put a thick coat on, but rather a THIN coat and rub it in- so that it will be absorbed into your skin. OR when you use hair conditioner…you apply it and the do what? Rinse it off. That is because your hair will absorb what it needs. Annie’s Chalk Paint will do the same thing in regards to the wax!
CLEAR WAX- this is how I use it:
1. I take a plastic spoon and a paper plate. Using the backside of the spoon- I take a good tablespoon amount of wax out of the tin and put it on the paper plate. (Place the cover back on the tin of wax until you need more)
2. I use my wax brush and pull some of the wax from the glob (for lack of better words.) Only the tips of your wax brush should have wax on them- and not a lot!!!! A little goes a long way! Again- you are not icing a cake where you want a generous amount of thickness. We are applying the wax very thin- pressing uniformly with steady pressure- but not so much that you are bending the bristles on the wax brush. I like to use the analogy that this is similar to waxing your car…you apply the wax- BUT NOT SO MUCH that when it is time to wipe it off or buff- you need a power tool to do it! So- apply a thin layer of wax and GET IT IN THE GROOVES OF THE PAINT.
3. DIRECTION TO APPLY WAX For most pieces (except when going for that Rustic look or when you have a textured piece) I usually apply the wax in the same direction as my painted brush strokes. Or- if I use a circular motion- I still ALWAYS finish with a few clean straight finishing strokes in the direction I painted. If I was doing a dresser top- I would start at the back reaching across while standing in front of the piece and as I apply the Annie Sloan wax – I work my way toward the front as so I don’t lean into a previously waxed area. You will see where you waxed prior because it does deepen the hue of the paint a slight amount but be aware of where you just waxed, and overlap slightly as you begin your next section.
4. After a few strokes from one side to the other with the wax brush- I will notice when the wax is not covering as much- that is my queue I need more wax. But first….using a lint free cotton t-shirt (an old one from my husband or an old sheet) and I wipe off the residual wax with one or two strokes in the same direction as I just waxed. (I am not buffing the wax at this stage! Merely just removing or incorporating any small wax “crumbs” that may be present.) Again- just one or two uniformed swipes across the whole area in one sweep – and that is it.
5. Resume waxing the next area- I wax strategically – meaning in an organized direction so I do not miss a spot.
6. The wax will dry (meaning no longer be tacky to the touch within a short time….maybe an hour or two?) However a variable in the dry time is the temperature and humidity where you are located. Is it is humid and cooler- cure time will be longer. If it is taking a long time and your wax is still tacky and you are not in the rain forest- reread my warnings above regarding applying the wax thin!
Depending on the piece I am finishing- I may have different amounts of wax coats. For instance…..a dresser. I may have 2 – 3 coats of wax on the top, but only 1 coat of wax on the sides and front. 7. Once the piece is no longer tacky- if you want to have a shinier finish- buff your piece. If you like it as is- then you are done! It does not take much rubbing and the piece will be quite shiny- so pay attention and have good lighting so that you do not over do it.
8. Remember NO WAX when painting pieces for outside.
9. Surfaces that will get serious use (wear and tear) like tops of dressers and tables – should receive 2 to 3 coats of wax. Follow the procedure above – always allow wax to dry between additional coats.
I will always lead my customers on a path to get the best value from their purchase. If a person walks in and is describing an application where another product would be better- I let them know! Now when it comes to tools- in the sense of brushes – I strongly believe that wax brush is a necessary purchase if you plan on doing multiple pieces. I understand that they are not inexpensive, but if you maintain them- they will last forever and will make your waxing process much faster and from a cosmetic perspective- will significantly improve your application! I always say- this is similar to applying make up. I honestly don’t think the applicator you choose for putting on eye shadow is a big deal- but try putting blush on with a skinny brush versus a nice big soft brush and you are going to look ridiculous. Invest in a wax brush and get a professional quality finish. You will not regret it.
WHY IS WAX IMPORTANT?
The wax is important to protect the paint – like polyurethane does when using Latex. Also – in regards to water protection, especially in kitchens and bathrooms. In that case- you need something made from wax and or oil….ie.oil and water don’t mix. (and not to be too odd here- that is why when you install a new toilet- they set the piece on a very THICK wax ring) I have tested waxes that are water based and they just don’t work as they come off when you wipe them with a cloth! Petroleum wax, also known as paraffin wax, is a by-product of the petrochemical industry…it is a residual from another manufacturing process. Annie Sloan Wax upcycles… in that the petroleum by-product is used in our wax versus of it being disposed. It is a good and economical base for Annie Sloan’s wax and besides that- there is also bees wax (which comes from bees!) added to make it soft and carnauba wax (from a plant) to make it very water repellent. The paint because of its particular structure allows the wax to soak in- like quality skin lotion will on your body. This is why Chalk Paint and Annie Sloan waxes marry each other perfectly- they were created to do so and no other mixing of products will produce the same results.
Ideally- I do recommend a wax brush and that is because when you apply wax with a rag- often you will get uneven application. Why is that? To help you understand- take your two hands and press them together like you are praying. (go ahead and do it- no one is watching!) Pay attention to where the pressure is when you push your hands together. It is in the cushy part of your palm and at your fingertips…but not under your knuckles. Now you understand why people get peaks and valleys when using a rag. If you can afford a wax brush- I strongly recommend using one. You will get a much better even level of wax. So, with all that said, brush or wipe your clear wax on. I typically apply the wax in the same direction I applied the paint or taking my brush and making small circles. I do this strategically – starting at one end and working my way across the piece. I apply the wax in sections and rub off the excess before starting a new section. I typically use a lint free old white t-shirt or rags that you can buy at Lowes or Home Depot. And sometimes- I use cheesecloth to wipe off the excess wax. Once the clear wax has cured…..you can then accent areas with dark wax if you would like to, wiping off as you go. Wait until it is no longer tacky (usually a couple of hours or less) and buff to desired sheen. Wait 24 hours in between adding more layers of clear wax if you are building up a for a stronger finish. As for the application- I like to use the analogy of hair conditioner. When you wash your hair- you put on conditioner after the shampoo. And then what do you do? Immediately wash it all off! Why is that? Because your hair will absorb only what it needs and we rinse the rest away! Imagine leaving the conditioner on your hair with out washing it off- what would happen? You definitely won’t have a “Good Hair Day!”, that’s for sure!
Why do I need to wax it before I sand, that seems backwards?
When it comes to sanding the paint prior to wax to make the surface smoother- that is fine. I often do that and almost always distress with sand paper prior to waxing. (but keep reading to understand the pros vs cons on this!)
The only caveat to be aware of when sanding your painted surface – is that sometimes people will over sand- and begin polishing and burnishing their paint. They are breaking down the surface tension, compact the paint down, – making the paint very hard versus being porous. When you do this- the wax may not be able to be absorbed uniformly into the normally – porous chalk paint- and you run the risk of streaks where the wax is not absorbed well. As long as you have a handle on this and understand at what point you begin to temper the paint – then sanding prior to waxing is totally fine!!!
Why do I need to wax my piece before I distress, that seems backwards?
Annie Sloan recommends to distress after waxing….. As an Annie Sloan stockist we are obligated to promote that on behalf of Annie. But first – let’s clarify…you apply Annie Sloan’s Clear Wax, immediately wipe off the residual and then let cure….once the wax is dry- then you distress.
Ok- here are some of the reasons Annie prefers this hierarchy to approach distressing. so first….by distressing AFTER you applied wax it actually gives you a lot more control when you are sanding since it allows you to expose layers of paint or wood underneath gradually. Meaning- it is a bit of a safeguard if you are new to this type of painting. This is how you recreate that natural look of furniture that has been painted layer by layer over the years.
Another reason is that the paint is, well, chalky. It can be very messy when distressing if not waxed prior! By waxing it first, you really cut down on the dust made when sanding which is important if doing a piece in your home. Much more convenient than having to move it out- or perhaps it is a large hutch and you do not have enough muscle to move it.
Another reason to use clear wax first is that it will protect your paint from the dark wax- if you plan on “aging” your piece. The dark wax will actually stain the paint color. Now- you may want that actual effect- and if that is the case do a test spot on the back of your piece. Otherwise- apply a coat of clear wax and let cure…..then add your dark wax. But keep in mind- having a few layers of wax- especially on cabinets or the top of the dresser is important for protection!
As for me at my shop though, I typically will distress before applying my first coat of clear wax. (I know that is the opposite of what I just wrote above though) I distress before waxing since since less elbow grease is necessary. And since I paint a lot of pieces- this does help me. It does create a bit more dust to accumulate at the base of the piece I am working on- but I manage that fine.
So- now you know there is no correct answer to your question. : )
Why do I need to use clear wax first if I want a rustic, antique look ….shouldn’t I just use the dark wax?
Excellent question, we get this one a lot! First off, please know that the dark wax goes a LONG way, you need very little of it. Let me stress that- you need very little. The reason you clear wax first is that it will protect your paint color and it adds additional layers of protection.
As for the dark wax- it has a stain in it and can permanently stain your paint color if the barrier of clear wax is not there. When you apply clear wax first & let cure, then dark wax, you can control how much dark wax is applied and where it goes. If you just use dark wax first, where you apply it is exactly where it goes. That is it, and that is where it stays, darkened paint and all!However- sometimes I want a piece to be very dark- so in that case- I make the choice to Dark Wax without a applying a clear wax layer prior.
Dark Wax is not meant to be used where you apply 2 or 3 coats of it. It is one of the final steps you do to a piece. Kind of like adding decorative roses on the top of a Birthday Cake. You don’t add roses than add an additional layer of frosting over them.
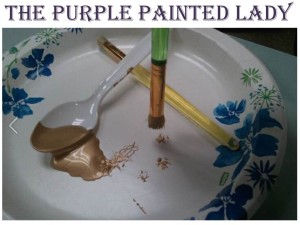
My piece is way too dark I used too much Dark Wax! Now what? (How to remove Dark Wax)
I actually did this on this piece shown. I liked how the dark wax looked on the body of the dresser, but not on the top.

If you applied a base of clear wax first and have let it cure before applying the dark wax, you can actually use more clear wax as a “magic eraser.” Just get some clear wax onto a rag and use it to remove the dark wax. Wipe in the same motion as you applied the Dark Wax.
If you did not use clear wax first (like my example shown in the photo), or the dark wax has dried completely and cured, don’t worry! First try a rag with a little mineral spirits on it. It should be damp but not dripping! I like to use “real” Mineral Spirits..meaning not the “green” Mineral Spirits that has a milky white appearance. I just don’t feel it works nearly as well as the original Mineral Spirits. With a bit of Mineral Spirits on your rag, rub the piece in the direction you applied the wax. (Meaning- do not going against the grain) The mineral spirits on the rag will remove some of the Dark Wax- but it won’t restore the piece as it was before you applied the Dark Wax. For me- in regards to this dresser shown- that was just fine and I loved the look I got. However, if this was not what you had intended….you have a little more work, but all is not lost. With chalk paint, you can simply paint right over the wax and start again. No extra prep work needed. Just make sure the dark Wax has dried! You cannot repaint over freshly applied wax…clear or dark! That is like walking on quick sand- ..not good!
My wax is still tacky and will not dry, WHY?
Again, the most common mistake I have found with calls I receive is that people have applied too much wax and are not wiping off the excess.
If you are thinking, “I applied the wax days ago and it is still tacky”- that is a sure sign you have too much wax!
The Purple Painted Lady will provide a hands on waxing demo if it will help you since an educated customer- is a prepared customer!
The Purple Painted Lady always recommends to apply wax with a wax brush (as explained above) and wipe off the excess! You cannot take too much wax off- but you do not want to be buffing your piece during this step either. When waxing- it is important to remember this:
We are not icing a cake! We are waxing furniture. So, very thin – uniform coats are best. If that is all that you remember from this hand out- you should be ok! Just like when you put moisturizer on your skin- you do not put a thick coat on, but rather a THIN coat and rub it in- so that it will be absorbed into your skin. OR when you use hair conditioner…you apply it and the do what? Rinse it off. That is because your hair will absorb what it needs. Annie’s Chalk Paint will do the same thing in regards to the wax! If you start buffing and find that your wax is still tacky, wait until it is no longer tacky to start buffing.
I would like a smoother finish. Mine has brush strokes on the surface.
If you have brush strokes in your paint and you do not like the look them – before applying your wax top coat…consider sanding your surface with some 220 or 400 grit sandpaper. Just enough to polish the surface and knock down the surface tension from the brush strokes. Also- something to consider is on your second coat…or final coat of paint…sometimes I will thin the paint by placing only a ¼ inch of water in a plastic cup. I dip the tips of my paint brush in the SMALL AMOUNT of water and then dip the tips of the brush into the quart of the paint. I am not gobbing my brush with paint here. This extra bit of water allows the paint to be a little thinner and smoother and it will glide on easier. And an end result, is a smoother finish.
Another option is using a kitchen cabinet sponge roller. I like the 4″ Whizz rollers and sell them at my shop. The roller will allow you to apply thin coats of paint.
Since Annie Sloan created Chalk Paint™ based on a desire to reproduce European charm. Depth and texture is key to the paint, making it more authentic. If, however, you would like a traditional super smooth finish, use a sponge roller to apply the paint. If that is not smooth enough, sand the surface prior to waxing with a sanding block sponge or sand paper- perhaps a 220 grit or a little higher. Or- on my “How To” page I reference using “auto body” grade sandpaper! This stuff is amazing! Use it before the wax is applied to remove some of the “ridges” left from the brush strokes.
USING A SPRAYER (spray your chalk paint®):
In regards to the surface based on application, if you are more of a seasoned furniture painter, you can also use Chalk Paint™ with a paint sprayer, but you will need to thin out the paint with water to get the right viscosity.
When it comes to spraying chalk paint®, here is some information for you:
Sprayers are awesome when doing a lot of painting at one time…or chairs with cane webbing or spindles. Or- if you want to achieve a buttery soft finish that is velvety smooth!
NOTE!!! You will use more paint due to over spray- but you also thin your paint with water.
Here are some suggestions for you:
1. If you are spraying your cabinets- we recommend FIRST TO paint a base coat of Chalk Paint® on them applying it in the traditional way- with a brush. Then, use your sprayer for all remaining coats.
2. The most popular and trending sprayer right now is HomeRight Finish Max Sprayer. Google it. The stockists that do spray- say they are impressed! It retails around $90. www.homeright.com
OR
High Volume Low Pressure! That is the way to go. Look at Graco … a very reliable brand.
OR
Go to at Harbor Freight. High velocity, low overspray model It is low cost – around $15. Many love It! It’s a pneumatic sprayer. Harbor Freight offers the quart size sprayers for just $9 but You have to own a compressor. Harbor Freight will run sales a lot where the pricing is:
compressor…$29
Hose…………..$15-20
Gun……………..$9
If you purchase on sale it’s a $55 set up
Harbor Freight offers an airless set up for $170… and get the warranty because it is worth it. They honor it without question.
OR
Another is the Graco Spraystation 2900 from lowes. They’re $119 and don’t require a compressor.
3. You will need to thin the paint- it is a bit trial and error on exactly how much- but the tip or nozzle size will play in to this. Most start by adding about 20% water to the paint- but you may need more water. Even with Annie Sloan paint- I have found that some colors to be a bit thicker than others. And depending on the tip you use on the sprayer- the viscosity may differ.
WAX QUESTIONS:
What does it mean if the wax stays “soft” showing indentations or impressions based on placing something on top??
As with any product, it needs time to cure! But this also can mean you have too much wax on your piece!!! While Annie Sloan products are very quick and easy to use, they do need time to cure and set up- this is beyond dry time. Many factors effect the curing time (temperature, humidity, how much wax was used, etc). But if there has been adequate “curing time” …and your wax is still tacky- that is a good indication you used too much wax.
If you do have too much wax- First try a rag with a little mineral spirits on it. It should be damp but not dripping! I like to use “real” Mineral Spirits..meaning not the “green” Mineral Spirits that has a milky white appearance. I just don’t feel it works nearly as well as the original Mineral Spirits. Take your rag and place it on the opening of the Mineral Spirits. Flip the container a couple of times in different areas of the rag. (Think like how you would put nail polish remover onto a cotton swab or ball!) With a tiny bit of Mineral Spirits on your rag, rub the piece in the direction you applied the wax. This is primarily important if you applied your wax in strokes and not a circular motion. The mineral spirits on the rag will remove some of the Dark Wax OR Clear Wax – but it won’t restore the piece as it was before you applied the Wax. Worse case scenario- with chalk paint, you can simply paint right over the wax and start again. But try to avoid this and wasting your product and note that you cannot repaint over freshly applied wax…clear or dark! That is like walking on quick sand- ..not good.
I am having trouble with the under color or stain bleeding through.
Most surfaces can be covered with one coat of Chalk Paint, occasionally two is necessary. Annie likes to say that it takes one and a half coats of paint. (read my “How To” page to learn more about that technique) With that said, some pieces of furniture can be difficult to accept for any type of paint! Bleed through can occur on pieces that have been polished with oil-based polishes that include a stain like “Old English” or deep red pieces that have a mahogany stain. If bleed through is really a problem, we recommend you go back and use Zinsser Shellac! I have a whole post on my “How To” page regarding this stuff. I LOVE IT! This will act as a barrier and seal from bleeding through the paint. It will prevent water stains from bleeding through. It will help when you have a piece that smells! Seriously- if it has a musty smell or smells like cigarette smoke. Coat the whole piece using Zinsser and it will “trap” those foul smells in- and you won’t have any more issues! After the Zinsser Shellac is dry, which takes whole 5 – 8 minutes ….simply begin painting right over it! This tip also applies to when you are painting with Old White or Pure White over a dark piece. As soon as you realize- that you have bleed through- grab the Zinsser. But first- finish painting the surface you started otherwise you run the risk of seeing a “lines” or where you stopped painting. Again…. **GO TO MY “HOW TO” PAGE AND READ MY POST ON SPRAY SHELLAC. I THINK OF IT AS A MIRACLE IN A CAN) When using spray shellac- apply it to the whole piece or side- not just a spot fix! You will actually see that when you paint. TRUST ME ON THAT! Using shellac will also help if the piece stinks! Yes- I said it…the piece smells. Perhaps it was in a basement or in the home of a heavy smoker….shellac seals in whatever you do not want to smell anymore! Can you tell I love this stuff?
I want to paint my Kitchen Cabinets with Chalk Paint™ by Annie Sloan.
As shown in Kitchen 2012 magazine- Chalk Paint™ by Annie Sloan is suggested as being the hottest paint in the DIY Blogosphere!

 The Purple Painted Lady is a strategic partner with Sunny Days Painting in Rochester, New York! Painting kitchen cabinets is something we do superior together. From our experience it is best to paint kitchen cabinets using at least 2 coats of paint. Again- depending on the finish you desire, you can brush or roll. (even spray if you have the capabilities) Most of our jobs are brushed or rolled)
After painting, apply your was top coat- just like you would on a dresser. The only thing additional is that when it comes to the wear and tear a kitchen endures- if you actually cook that is…. you will want to apply two or three coats of wax to seal it. Annie’s wax is water repellent and strong and basically becomes one with the Chalk Paint™.
You may need to re-wax your cabinets in a few years based on the usage, but overall, a periodic buffing should be more than adequate to maintain a superior finish. To clean your cabinets (or furniture) just use a damp cloth to clean. Lisa Rickert has children and a dog and puts her cabinets through some serious testing… and Annie has pieces that were waxed over 10 years ago in her home.
With cabinets- depending on the age of them and the style- you may want to do a test on one regarding coverage and verify that the stain does not bleed through. If you find that the stain on the doors bleeds through your paint, please reference my site here regarding my post on Zinsser Shellac. It is on my How To page.

Would I have to strip this chair before using Chalk Paint™ by Annie Sloan?
 I have painted chairs that were in much worse condition than that and did NOT strip. The most important part is to remove any serious loose paint. So, perhaps you may want to lightly sand the area where all the paint is chipped off in this photo. Also- – paint picks up the profile of what is already existing on the foundation. So- if you do not want it to be potentially “pocketed” or uneven due to the existing chipping- you should lightly sand that area.
Lastly- what is the price for Chalk Paint™ relative to using Latex?
The Purple Painted Lady has been painting furniture for over 10 years. In the past when I used Latex paint- I always sanded (which = $ & time), then using a tact cloth to clean what I just sanded ($ & time.) Once done with those two steps- the piece would be primed ($ & time) and then the piece would be base coated and then- finally painted. (phew- makes me tired thinking about all that I use to do) Chalk Paint™ by Annie Sloan costs $36.95 per quart. A quart of Chalk Paint™ by Annie Sloan will cover roughly 150 square feet – compared to any latex sold at Benjamin Moore, Sherwin Williams, Home Deport or Lowes brand paint- which will only cover at most 100 square feet.
Chalk Paint™ also dries super fast and will allow you to begin and finish a project in one day. Depending on the size of your project- you could easily finish it in one afternoon. When you add up the time, money, and paint saved, it really is worth the price! With Chalk Paint™, the average cost invested per piece (now this is dependent on the size of the pieces you are painting) but I would estimate your costs to be between $6 -$12 (that is for both the paint and wax.)
Outdoor use: I am hoping /planning on painting some outdoor wooden chairs this next week and I am wondering what you would suggest I use as a topcoat if any. I am hoping to use a few of my favorite colors to create a beautiful peaceful garden atmosphere instead of the usual stark white or wood stained patio chairs that you usually see. Thanks again, FROM Cheryl in Hamilton, Ontario, Canada
To address your question— Typically- Annie recommends NO WAX if painting “outdoor” furniture such as wrought iron, Adirondack chairs- or any piece that was built to withstand the elements.
However- if you have a protected area- like an outdoor porch where the piece will be protected from the hot sun – you can wax a piece.
Another variable is typically where you are located in regards to temperatures. Being that you are in Canada- I doubt sweltering HOT heat is an issue- but keep in mind- hot sun beating through a window on to a piece of furniture or a piece sitting outside in the sun that has been waxed- the heat can reactivate the wax a bit. Now with that said- keep in mind that Annie has had her Decorative Paint Products for over 20 years and they have been used in Spain where temps can get very warm- and there has been no issues.
The last idea- is sealing the chalk paint with an outdoor polyurethane. You may want to get the spray can kind and carefully cover the whole chair uniformly. : )
I used the lacquer on my floor over Pure White Chalk Paint and it is yellowing a little, why?
If you have gotten some yellowing with the lacquer- you applied it too think. It is very important to roll it on in a thin coat using a sponge roller.
Have another question you don’t see here? Please contact me and I will be happy to answer your question! Just email takuntz@rochester.rr.com and note “Dear Purple Painted Lady” in your subject.