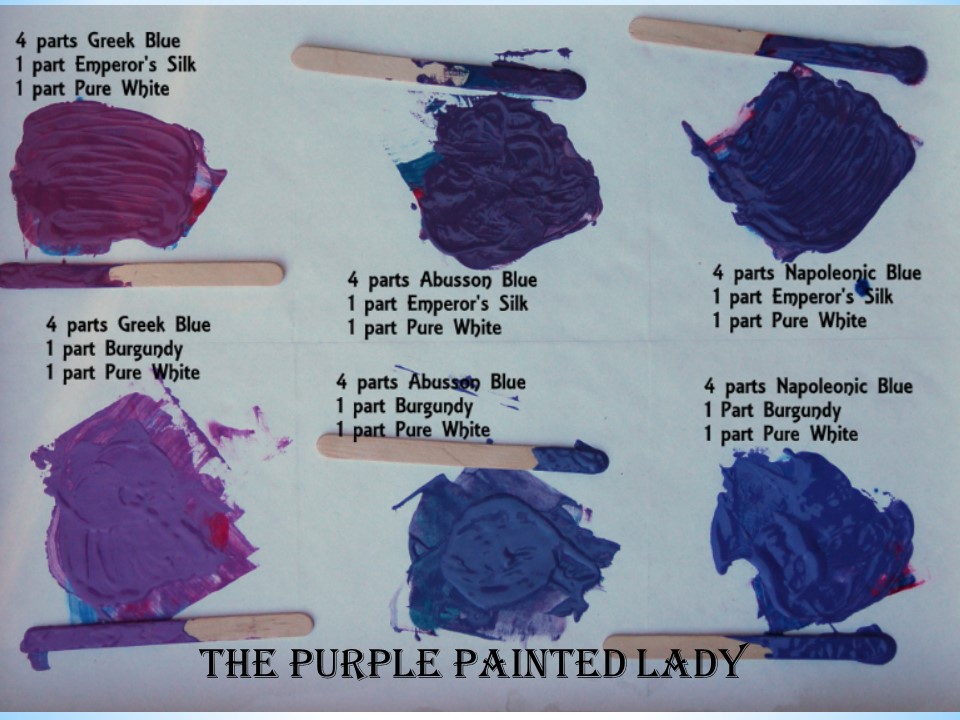
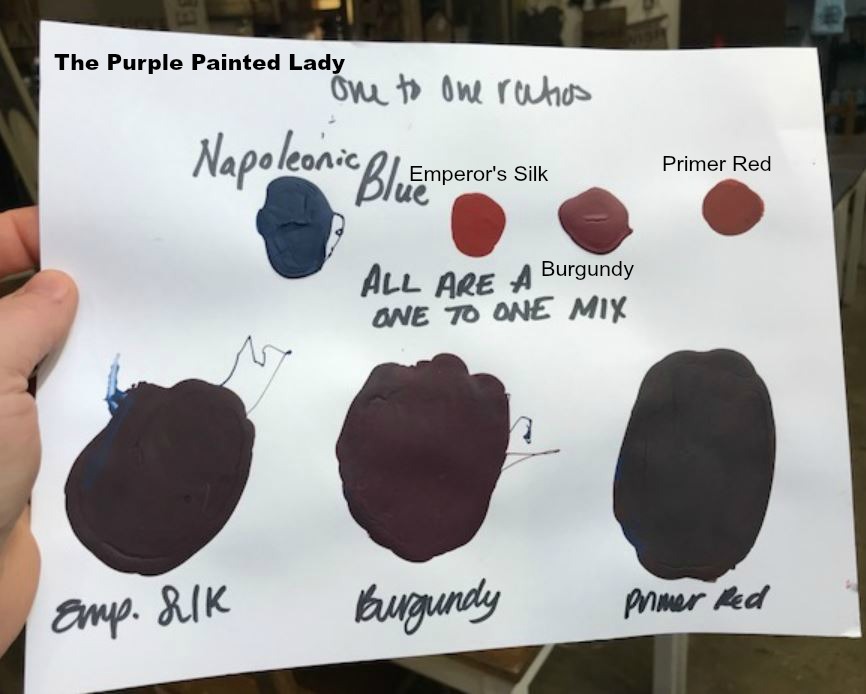
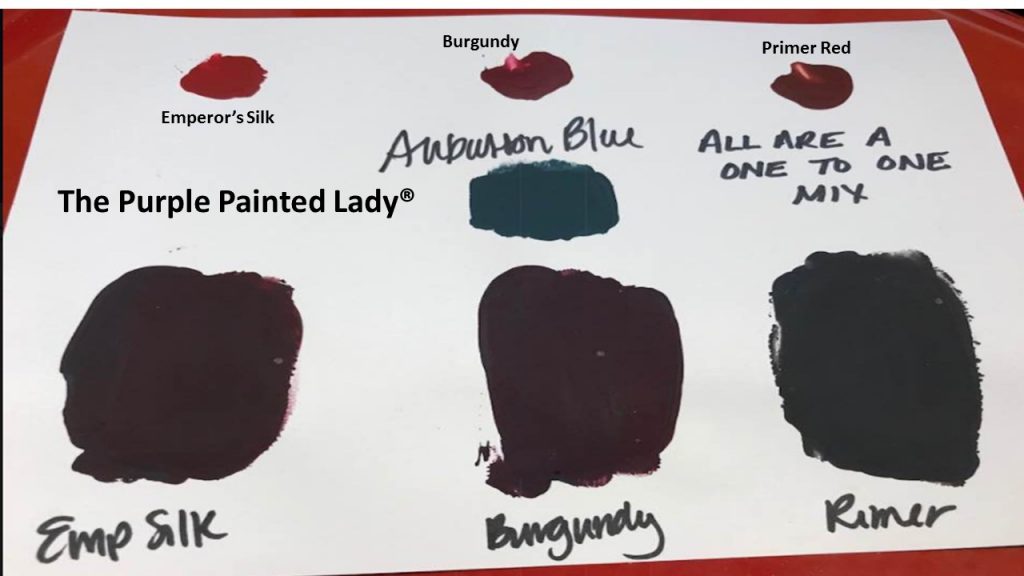
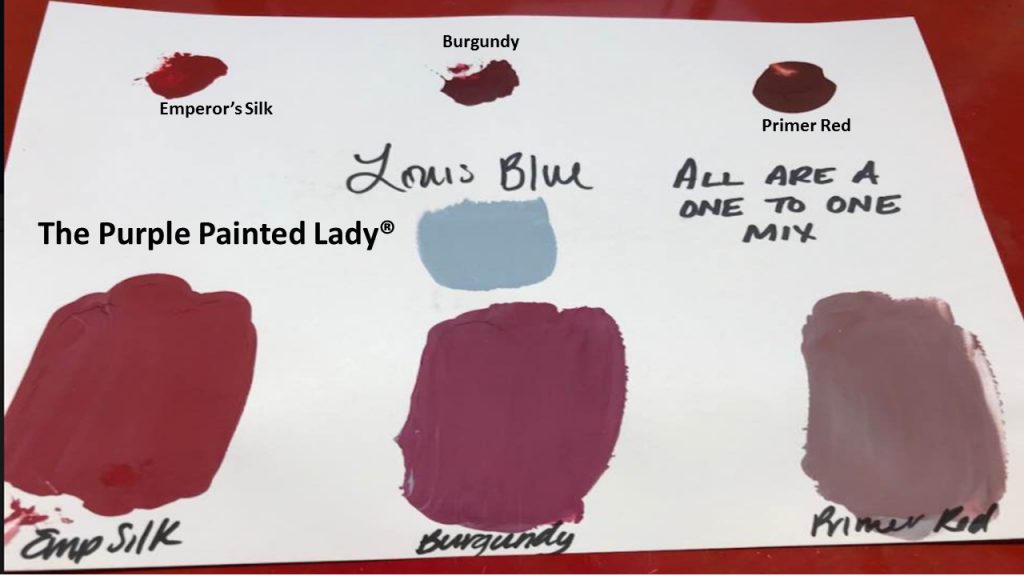
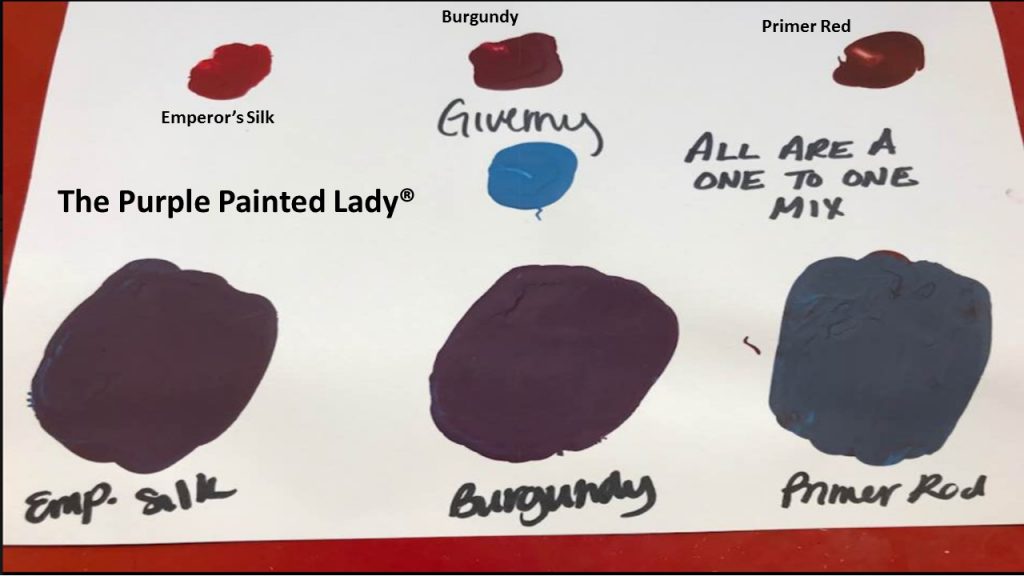
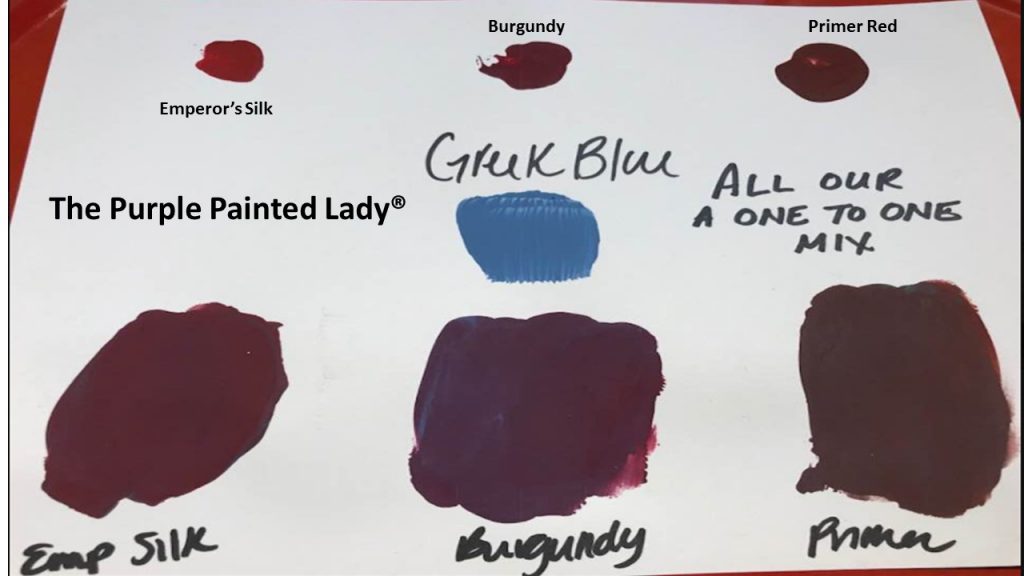
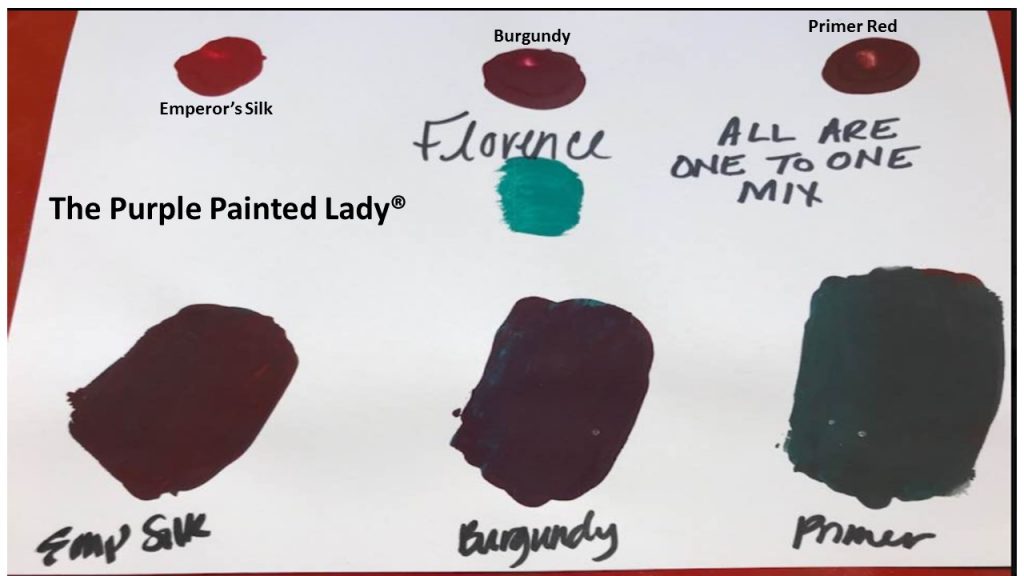
Pantone’s color of 2018 is called Ultra Violet! We decided to play with some different Chalk Paint® by Annie Sloan colors to create different shades of violet or purples. See the results below or Check out this YouTube video on The Purple Painted Lady Channel by Courtney and Trish at The PURPLE Painted Lady mixing up various violets and shades of purple.
Please feel free to save these to your Pinterest boards!!!!
First- if you have a local stockist- go visit them and build a relationship with them. Go to them with your questions and project issues. BUT- if you do not have a local stockist- we invite you to try our customer service!
As for buying any of the products we mentioned earlier in this post- I hope that you select The Purple Painted Lady® to be your one stop resource! We have two locations in western NY. Check out our Information tab and come and meet us! Otherwise- if you are not located near me- the following information may apply to you.
This information is directed to those who do NOT have a local stockist. Because if you do – go and meet them, shop from them and build a relationship with them!!! The guidance, information and knowledge they share with you – will be invaluable. Get inspired by their shop that they lovingly curated – just for you! Enjoy that one on one experience!
But for those who are in a location where there is no one selling paint products- and you must buy on-line- consider us. With that said, visit www.anniesloan.com to find a stockist near you.
We are here to help you, our customers! We want you to be successful!
SOME OF THE REASONS WE THINK THE PURPLE PAINTED LADY® CUSTOMER SERVICE IS THE BEST:
* We love our customers and it shows!
* Ordering online? If you order before 3 pm EASTERN TIME any day Monday thru Friday – we will ship out your package that SAME day. We ship orders out every since week day all over the US. (THIS IS DIFFERENT than SAME DAY DELIVERY. We do not offer that)
* We offer low flat rate UPS shipping cost so if you are one town away or 10 states away- the shipping cost is the same.
* We have awesome follow up customer service, too!
: ) And I will be here to help you as you progress through your future project! And if I do say so myself- we offer the BEST customer service that you will ever experience! Lastly- if I was helpful to you- ….please consider leaving a positive review on my Facebook business page sharing your positive experience or thoughts about The Purple Painted Lady®. Here is a link to my Facebook page=> http://www.facebook.com/pages/The-Purple-Painted-Lady/291882785710 This really helps me! (wink, wink!)
XO
Trish
The Purple Painted Lady® ~ the serial no. is 86/641,416 with the US Trademark Office
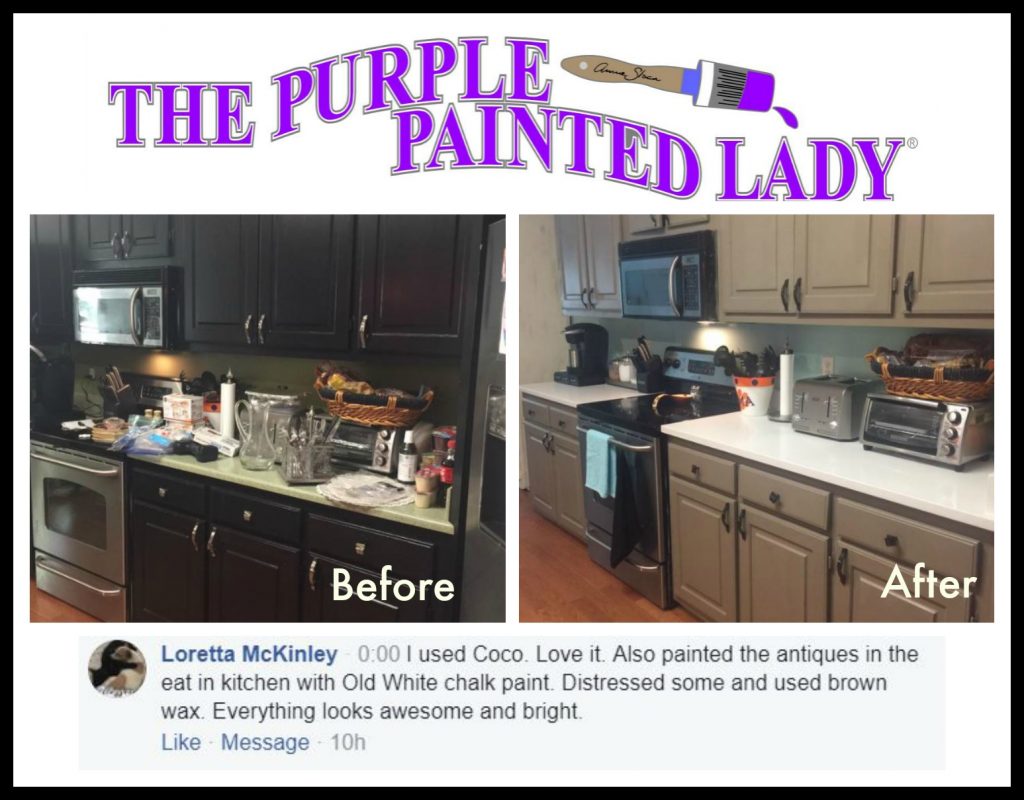
Paint Your Dark Cabinets……..don’t be afraid because The Purple Painted Lady is here to help you!
Here is a photo from our customer Loretta McKinley who painted her dark black cabinets with Coco Chalk Paint® by Annie Sloan and used dark wax.
Below are a couple of links to full length tutorial and intense information for painting your cabinets. The videos are literally like taking a workshop with The purple Painted Lady, but …..instead they are free.
After having my shop for 8 years and have helped literally, thousands of people transform their dark cabinets to something lighter, brighter and fresh…. all of us at The Purple Painted Lady are here to help you too!
I know the feeling – it is almost like depression when you walk into a room of your home that is dark and that you do not like. How long are you going to live like that? There is no reason to not change it because:
it’s affordable! For an average size kitchen, you can purchase your product and tools to transform it for under $300!
it’s okay to paint wood…especially if you do not like it! Life is short…eat the cake! But more importantly, painted cabinets are more appealing during resale.
you will be happier living in your space….and why shouldn’t you like where you live?
TIPS to think about before beginning any cabinet painting project:
• Become familiar with your painting technique. If painting cabinets is new to you, consider painting a small piece of furniture first to get used to applying both the paint and wax. It can also be helpful to have a small scrap piece of wood available in your workspace as a surface on which to test each step of your process before proceeding to the cabinets.
• If you are painting with a custom color, be sure to mix enough paint for the entire job.
• Paint in the way the cabinet doors are constructed. If the doors are typical five-piece construction, paint the center panel first and then proceed to the rails and stiles, using the brush to create a nice line where the rail joins the stile. Use even brush strokes and don’t overload the brush with paint. When painting the rails and stiles, start painting on the outer edges and work your way in towards the center panel to avoid excess paint pooling where the panel joins the other components.
• To help ensure a consistent look, complete each step of your finish across all of your cabinets before proceeding to the next.
• Chalk Paint® is a thick paint. Load your brush, get it on and with a light touch feather it out. It does not like to be played with for an extended time!
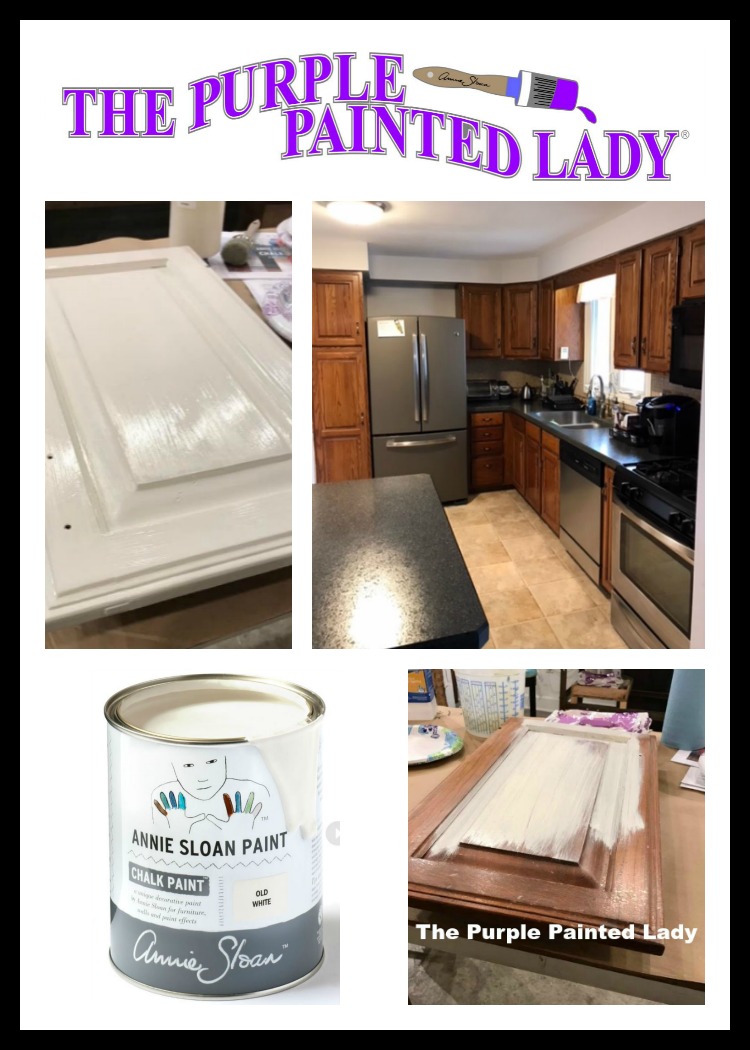
Now, we have a bunch of posts here on our website sharing tips and tricks and instructions on how to paint your cabinets, but this week we decided to share some real life video! So, catch us on our YOUTUBE channel while we paint the cabinets shown below with Old White Chalk Paint® by Annie Sloan.
Video ONE (this contains the nest tools to be using, how to prep properly, and first coat application)
Video TWO (this contains tips for applying a second coat and your first coat of wax) Jump to the 14 minute marker to skip some of the review if you are not a patient person. LOL
PAINTING OVER THERMAFOIL?:
We have a wonderful technical director at Chalk Paint® by Annie Sloan headquarters. She shared with us,
“The subject of painting over Thermo-Foil or other types of foil-finished cabinets comes up often. I know some of you do it and it may look good for awhile, but I really have to discourage you from doing so. These foil finishes are very sensitive to heat and moisture which can cause the foil to peel away, taking any paint finish with it. Also, paints of any kind will not bond to these materials and can eventually chip and scratch from normal wear and tear. I spoke last month at the Surface & Panel Symposium in Milwaukee which was attended by prominent printers, foilers, and cabinet manufacturers in the US and Canada. I made a point of asking various ones if their surfaces could be painted and their answer was a resounding NO. The good news is they are working on a paintable version to address the needs of the design community. The bad news … engineered cabinets with foil finishes is the future. They are being produced in various wood patterns, colors, and texture, and they truly amaze the eye and the hand. While we have been used to seeing foil finishes in white or beige applied as a sheet over solid doors, I saw it being applied to the individual components … center panels, rails, and stiles … for the more classic 5-piece constructed doors. They are making great strides in the stability of these finishes so heat and moisture problems will be a thing of the past. I believe it will be in our best interest to stress to customers that Chalk Paint® is a wonderful option … for wood and the occasional laminate cabinets.
KITCHEN CABINET PROJECT STEPS Using Annie Sloan Products 585-750-6056 www.ThePurplePaintedLady.com This is a high level of the order on what to do…so, make sure to still read the individual instructions for paint and wax for detailed info!
1. Remove cabinet doors and number them. (Some people will paint the doors while still hanging. I don’t…but you can if you want to)
2. Remove hardware (Have an old home? – I leave the hardware in that cabinet’s cavity in a plastic bag so to know which door it goes to- keeping screws with their original hardware and doors is helpful.) Numbering cabinets can be helpful too.
3. CLEAN! Lightly Sand ONLY if you already have product or “stuff” on your cabinet that causes bumps or serious imperfections that you do not like. Spray Krud Kutter on a rag and wipe down doors –- THEN=> Using a fresh rag that is moisten with fresh water….wipe the doors thoroughly down again! <= THAT IS AN IMPORTANT STEP …allow dry time -maybe 30 minutes? Use a Scotch Brite pad if excessively dirty OR have loose paint. Denatured Alcohol or TSP can also be used, but thoroughly rinse with clean water afterward (always rinse with fresh water no matter your cleaner.)
4. IF changing the hole orientation with new hardware – Fill holes from old hardware with wood filler and sand once it is dry.
5. Drill new hole locations.
6. If you need to use shellac…use new Zinsser Bullseye Clears Shellac (spray or brush/rub on) on and allow dry time- 2 thin, uniform coats are best. If you used wood filler you will probably HAVE TO shellac the doors. Lightly sand with 200 grit. Do not break through shellac. NOTE! Most times you do NOT need to use shellac! => So, do a test by applying Chalk Paint® without shellac on one door that is seen the least,….if you have no bleeding of tannin- skip this “sealing” step. If you get bleeding after 1st coat of chalk paint®- apply shellac over paint once dry. NEVER apply shellac over wax! I like to apply shellac with a rag- NOT a brush.
7. NOW the fun part…..PAINT!: We love to use the Annie Sloan 2” Flat Brush. (this is our favorite brush to paint cabinet doors with) (https://shop.thepurplepaintedlady.com/Chalk-Paint-Flat-Brush-Large-by-Annie-Sloan_p_174.html) If painting the backs of the door- which I always do even with just one coat- paint backs first, and finish them all the way to completion using your top coat. Always “practice painting” and apply wax on the back of the doors before starting the fronts- which are the most important side of the doors, right? Want a smoother finish- thin your paint with a little water. Maybe 20%? (Paint most likely 2 coats…could be three depending on color and technique) Apply first coat and wait 24 hours…..if possible. In general, the paint dries within 30 to 45 minutes, and then you can apply additional coats, but after the first coat only- if you can wait 24 hours, do it. : ) Annie Sloan herself has always stated, never do more than three applications in a 24 hour period. that could be two coats of paint and one coat of wax, or one coat of paint and two coats of wax. It just starts to get too thick and you want each individual to set enough.
APPLYING THE SECOND COAT: I will often use my Fine Mist Spray Bottle (https://shop.thepurplepaintedlady.com/Fine-Mist-Sprayers-10-oz-Clear–Great-To-Use-When-Applying-a-Wash_p_883.html) filled with water. I lightly mist the dried paint and then immediately apply my second coat. This light mist of water acts like a slip coat and makes painting the second coat easier and smoother. Always allow ample dry time. Always end painting a section with a clean finishing stroke from end to end.
8. Number of Coats of Paint: Again…the number of coats is dependent on desired look – LIGHT sanding the surface after 2nd coat with 220 or higher grit sandpaper will create a smoother finish -ONLY IF DESIRED…but this is not required. Stay away from the edges if you do not want to break thru the paint to show base cabinet.
9. WANT A WORN DISTRESSED LOOK? Just because you use Chalk Paint® does NOT mean you have to distress to get a rustic or shabby chic look, but… if you do like that…this paint is perfect for it! So, distress edges and corners of cabinets with Annie’s sanding sponges …then blow dust off! I do this outside in the garage or outside if nice weather.
10. Seal and Protect Your Cabinets: Top coat the cabinets using Clear Wax (2 coats is optimal – (follow our wax instructions!!!) Make sure you can glide your hand on the wax surface after removing excess wax. If using Dark Wax or making a glaze – apply after 1st or 2nd coat of clear wax. Try using Annie’s FINE Sanding Pad on the wax surface after it has cured to get a shinier finish- use with GENTLE pressure. Dark Wax is the last step of your whole project. Unless you are using Metallic Gilding Wax to embellish details- then the gilding goes on last.
INTERESTED IN USING A SPRAYER FOR YOUR CHALK PAINT® in Liters?:
If using a Fuji Q4 Platinum sprayer – here are a few things learned be a fellow stockist:
1. They used a 1.3 mm tip and have changed to a 1.8 mm tip since they found it works much better. Because the paint is a lot thicker you will definitely need different tips than you were using with the paint that was packaged in quarts” 2. Warming the paint helps and thinning with warm water also works. Thinning about 10% to 20%. (start with the lesser, but you can add more paint if you add too much water) 3. Having the shop and doors heated to about 70 degrees makes a difference. So, work in a reasonably warm space. And this is not while you are in it. The space should be kept at this temperature consistently prior and for the entire cure time! 4. Also playing around with the sprayers spray pattern settings was needed.
Additional IMPORTANT Sprayer Information for Chalk Paint® by Annie Sloan:
Experiment to get the right results when spraying with your particular model. The most important thing to know is that there is no ‘magic’ ratio of paint to water and you will need to tweak it every time you spray, as site specific conditions mean that results can vary. With that said, Annie Sloan Interiors recommends that you add 10% to 20% water as a starting point.
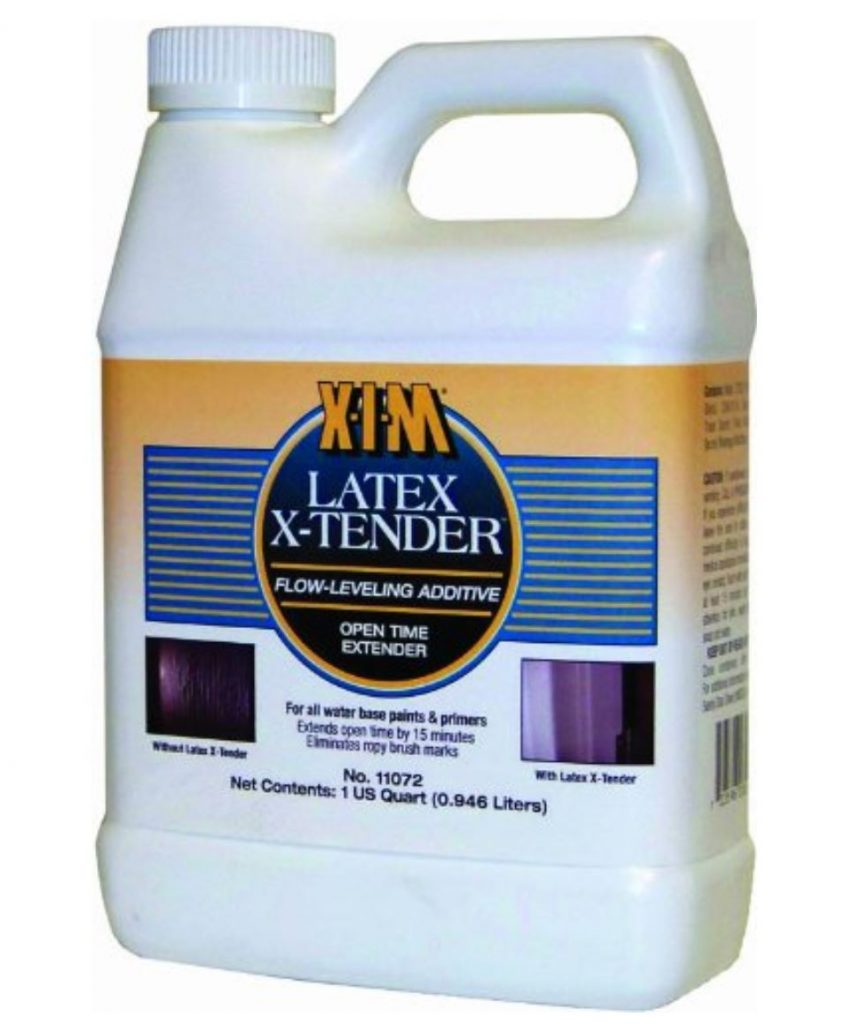
ADDING A PAINT EXTENDER:
You can also add a paint extender to the Chalk Paint® to help get a smooth finish. We reached out to Annie Sloan Interiors and they shared that they have used XIM Latex Extender with good results in the past. Don’t let the name fool you- there is no Latex in Chalk Paint®. This product is meant to be used with any water based paints and Chalk Paint® is water based. The one in the picture below is the one Annie Sloan Interiors referred us to use, but others are available. Their spray consultant guys tell them that the main ingredient of these extenders is propylene glycol and that you can effectively make your own extender using this ingredient. Personally, I would just suggest purchasing the product pre-packaged and ready to go.
Even though you have added water as stated in the previous step – you still dilute with water AND add the extender – if you find it’s too thin to spray you can always add more paint. Don’t get too hung up on the amounts – the spray guys we work with just eyeball it!
Using an airless sprayer is not recommended – the high solids content in Chalk Paint® will damage the nozzle.
You will want to warm your Chalk Paint® because it will spray and settle better. Place your container of paint in a bain marie of very hot water for 15 minutes. Bain Marie is a container holding hot water into which a pan is placed for slow warming. After 15 minutes, When we have taught this in workshops in the past, we used a large crockpot as a bain marie. It doesn’t really matter how much water is in there just make sure it is not too high that when you set your containers in- that the water overflows into your paint!
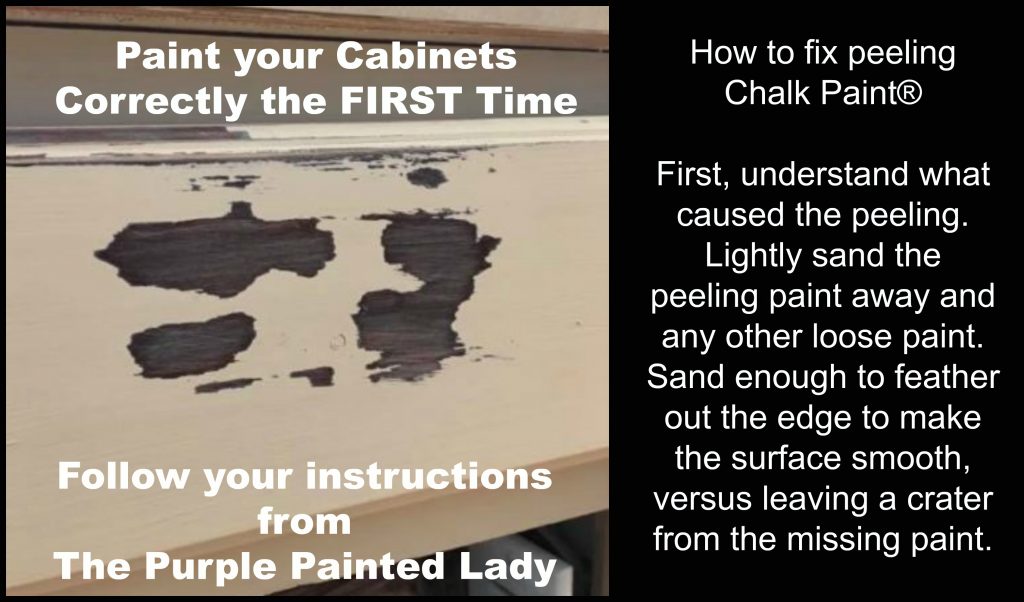
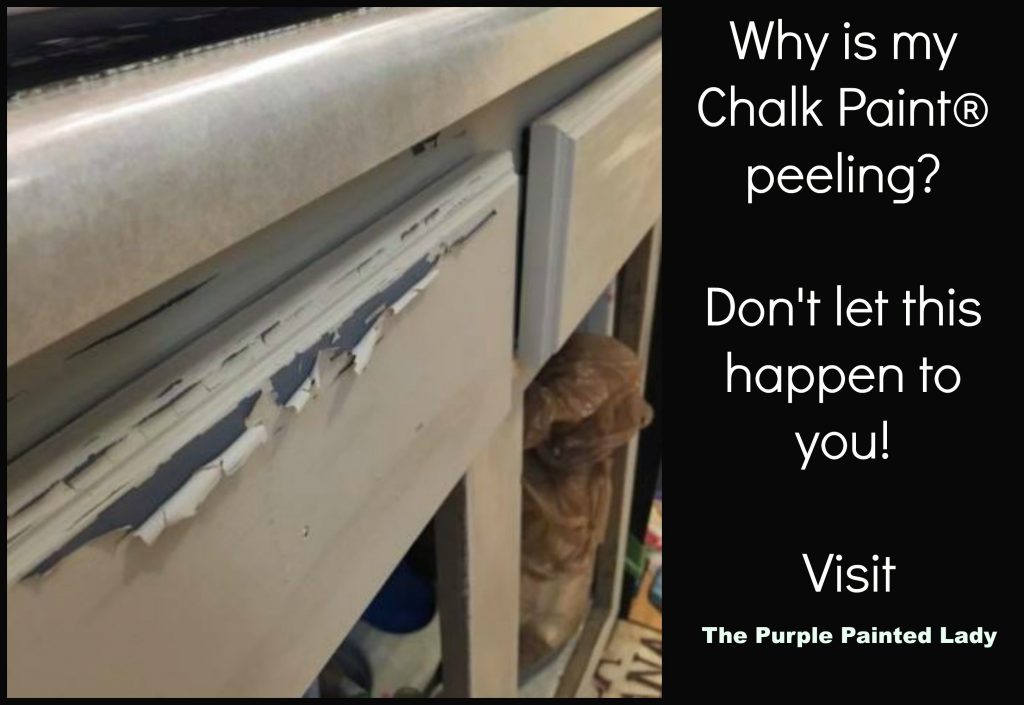
Friends don’t let friends paint in situations where peeling will occur!
If there is one thing you can take away from this post- it is to please read the instructions that The Purple Painted Lady provides with your product purchases. They are really important and will help you be successful the first time you use your products.
So, for example I thought I would share a couple calls I received this weekend from customers calling with problems.
Customer calls that Chalk Paint® is peeling off of cabinets in specific areas.
TRISH: (ring,ring) Hello, this is Trish, The Purple Painted lady. How can I help you?
CALLER: I am working on painting a friend’s kitchen. I painted my boyfriend’s kitchen already and it turned out awesome, but on this project, I have one coat of paint and it is peeling. Why is this happening?
TRISH: Okay, Are you using Chalk Paint®?
CALLER: Yes
TRISH: Peeling can happen based on a few things:
You did not clean the surface well and there is something on it repelling the paint or preventing the paint from adhering correctly
Temperature. If you are painting in an area where it may be too cold, like under a constant 60 degrees.
What type of surface are you painting? You do not want to paint over Thermafoil.
Is the peeling happening all over or just in some spots…like near the sink, dishwasher, over the stove, an area near a pet’s food dish or near a garbage can?
CUSTOMER: Yes, it is peeling only in a few spots. Like right below the sink, a corner near a handle and above the stove.
** since the peeling is only happening in a few spots – this leads me to believe that the problem is isolated to areas that were not properly cleaned. They can be dirtier than other areas and may have needed some extra TLC or someone missed cleaning them as well as they should have been.
TRISH: Did you clean your cabinets per our instructions? The prep prior to painting with Chalk Paint® is one of the most critical parts. If there’s any residual dirt, oil etc. left on the cabinets prior to painting,…….the paint will not adhere properly.(I know this customer has already successfully completed a different kitchen and has experience with painting. But…something is different)
HOW TO REMEDY PEELING PAINT:
Per our instructions, I recommend to clean cabinets, to follow our 2 step process.
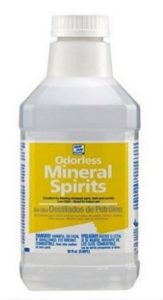
Wipe down the cabinets with a rag moistened with odorless mineral spirits (NOT the milky white environmentally green kind.) We like to use the Kleen Strip brand due to the fact that just because a product is labeled “odorless” – does NOT mean that is totally true. Some “odorless” mineral spirits still have a very strong smell. We like this brand better than others.) Once all of the cabinet doors and casement have been wiped down with the a rag moistened with odorless mineral spirits, then go back and follow up using a new rag moistened with fresh water to wipe them again….rewetting and rinsing the rag periodically. When using the odorless mineral spirits or the rag with freshwater, neither should be dripping wet!
Sometimes, depending on the amount of crud that may be on a door or area, you may need to use a Scotch-Brite scrubby. This could be because of where your pet’s food dish is located, or a garbage can is near a cabinet and people miss when throwing things away or by the kitchen sink….. So, in order to clean off any extra “stuff“ for lack of better words …. meaning “filth, grime or crud” use a Scotch-Brite scrubby.
CALLER: I left the cleaning to my friend.
TRISH: They either did not clean well enough or they did not wipe with fresh water thoroughly enough afterwards. It could be both?
CALLER: What do I do now?
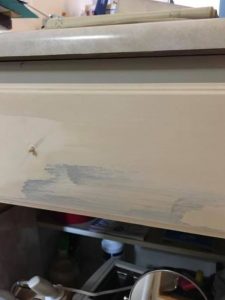
TRISH: I recommend that you lightly sand the peeling paint away and any other loose paint. Sand enough to feather out the edge to make the surface smooth, versus leaving a crater from the missing paint. Sand enough of that area to lightly remove any potential left behind residue.
Then wipe away any dust.
Lightly paint over that area and let it dry. This should a thin coat, but with total coverage. It should not re-peel….but if it did and you followed our instructions…text Trish! Her number is on your instruction sheets.
Once that has dried, wait a few hours and paint again. The moral of this story- take extra time to clean your cabinets before painting…and do it yourself if you want it done right. : )
2. TEMPERATURE is a factor with paint products…….in fact, ….temperature is a big deal!
Never store or use your paint products or top coats in the cold! Never store them where it will be less than 55 degrees too!
It’s important that when painting anything ……that the paint is at room temperature ….and the piece being painted, such as a cabinet door or a dresser is at room temperature too. Meaning, you cannot go out to the cold garage turn on a heater for the limited time you are in there and then turn it off, when you leave…..but leave your paint and painted piece to suffer in the cold….your project will fail! This also means, if you are bringing in a piece from the cold garage and immediately start painting it just because you are in your warm home. The material, be it wood or otherwise of the dresser or cabinet needs to be at room temperature also. This may mean, you may need to wait a few hours before starting to paint. Once done painting, while the paint dries the piece has to stay at room temperature through the entire curing process.
I had a customer over the weekend who sent me photos because she was painting a dresser and to her surprise, it started to peel on the side of it. After asking a few key questions, like how did you clean it, what the temperature was where she painted….. She immediately said she painted it in her garage. It was only 30° F outside. She thought it was warm enough in her garage to use the paint and to store the piece while it was drying. NOPE…..it is not, I replied. Now the paint in some areas is peeling off and will not adhere properly in cold temperatures. To remedy this, bring the dresser INSIDE…let it get to room temperature on its own. Then, follow the process noted about where it states “HOW TO REMEDY PEELING PAINT”
And just for good measure- I thought I would share a little more about painting cabinets. Paint is basically, all chemistry. It’s a liquid that when dries….. people expect it to be as strong as a military tank. That just doesn’t happen by magic. When people are painting their kitchen cabinets (or floors or laminate/Formica surfaces…or really smooth surfaces ) ……..if possible always apply the first coat of paint in a uniform, thin application, but where you still get complete coverage. Then…….(if possible) wait til the following day to paint a second coat. Yes, I know we share that you can paint or wax a total of three applications in one day …..but by waiting for that first coat to set, like overnight …..the better it will be on the cabinets. I also tell customers to not try to scratch the paint with their thumbnail and see if they can scratch some off……because guess what….. you will be successful. This would happen no matter what paint line you’re using. If fact, many paints have a 30 to 45 day cure time. Chalk Paint® is very unique in that, as long as you are gentle initially- you can begin using your painted and waxed piece immediately. This combination is extremely durable but again, you have to allow some time for the chemistry to do it’s thing.
First- if you have a local stockist- go visit them and build a relationship with them. Go to them with your questions and project issues. BUT- if you do not have a local stockist- we invite you to try our customer service!
As for buying any of the products we mentioned earlier in this post- I hope that you select The Purple Painted Lady® to be your one stop resource! We have two locations in western NY. Check out our Information tab and come and meet us! Otherwise- if you are not located near me- the following information may apply to you.
This information is directed to those who do NOT have a local stockist. Because if you do – go and meet them, shop from them and build a relationship with them!!! The guidance, information and knowledge they share with you – will be invaluable. Get inspired by their shop that they lovingly curated – just for you! Enjoy that one on one experience!
But for those who are in a location where there is no one selling paint products- and you must buy on-line- consider us. With that said, visit www.anniesloan.com to find a stockist near you.
We are here to help you, our customers! We want you to be successful!
SOME OF THE REASONS WE THINK THE PURPLE PAINTED LADY® CUSTOMER SERVICE IS THE BEST:
* We love our customers and it shows!
* Ordering online? If you order before 3 pm EASTERN TIME any day Monday thru Friday – we will ship out your package that SAME day. We ship orders out every since week day all over the US. (THIS IS DIFFERENT than SAME DAY DELIVERY. We do not offer that)
* We offer low flat rate UPS shipping cost so if you are one town away or 10 states away- the shipping cost is the same.
* We have awesome follow up customer service, too!
: ) And I will be here to help you as you progress through your future project! And if I do say so myself- we offer the BEST customer service that you will ever experience! Lastly- if I was helpful to you- ….please consider leaving a positive review on my Facebook business page sharing your positive experience or thoughts about The Purple Painted Lady®. Here is a link to my Facebook page=> http://www.facebook.com/pages/The-Purple-Painted-Lady/291882785710 This really helps me! (wink, wink!)
XO
Trish
The Purple Painted Lady® ~ the serial no. is 86/641,416 with the US Trademark Office

 again….rewetting and rinsing the rag periodically. When using the odorless mineral spirits or the rag with freshwater, neither should be dripping wet!