One of the easiest ways to add richness and depth to a piece of furniture is with using Dark Wax to finish it!!! Dark Wax ages a piece and gives it a depth of richness compared to nothing else! This posts is specific to Annie Sloan products, but keep in mind- whatever is your product of preference- explore using Dark Wax like I show on this Bombay dresser below.

I would like to state…that I am going to share a few ways to use dark wax. Depending on the end result you are trying to achieve- directions for you may be different. Using Dark Wax allows for many artistic end finishes- so the instructions will vary depending on what you desire. My first suggestion to customers is before applying Dark Wax to that sentimental piece you inherited from your beloved grandmother. Pick up a cheap little table and practice on that! Perfect your technique prior to beginning. OR- use the back of your piece to practice on since no one will probably see that.
Wax is for protecting furniture:
I should preface in saying that using wax as a protective top coat only makes sense when you have painted with a product that is porous and can absorb the wax. Chalk Paint® or Milk Paint are two perfect examples of porous paint. Using wax as a top coat- has been the process of finishing furniture for 100’s of years. Wax as a top coat, does not apply as much when you have used Latex paint because as you may know- Latex has a rubbery- sometimes plastic feel to the surface and the wax cannot penetrate it as well. Latex literally floats on the surface of a piece of furniture – which is why you always use a primer first to give the Latex paint something to “bite” to. Also, this is why when you bang into a piece painted with Latex- the latex typically chips or flakes off.
But back on focus regarding wax, and dark wax for that matter. I always tell my customers that using dark wax is a bit of a creative process. Honestly, there is no one way to to apply it – because in the end…aesthetically if you love the look of the piece you created…then I would say you did a perfect job.
Generically speaking, in the hierarchy of how to approach a project, or the order you do your steps in, it is as follows:
1. Apply Chalk Paint® or Milk Paint & let it dry fully.
2. Apply Clear Wax (immediately wipe off the residual…watch my VIDEO HERE if you are new to waxing please.) & allow it to dry (or not)
3. Apply Dark Wax (immediately wipe off the residual) and allow it to dry so it is not tacky.
4. Lastly…. apply French Gilding Wax if you are using it.
Here are some suggestions on how to use dark wax that will give you a better result or look:
When I use dark wax I will either:
1. Using dark wax straight without cutting it over a layer of clear wax that has dried: Apply it straight over my dried clear wax that I already applied to the piece of furniture. (I am noting this application first in my list since this is the way Annie Sloan recommends) This approach – has a layer of clear wax that was previously applied and has dried and is no longer moist to the touch. This layer of clear wax before the dark wax is for protection, and helps prevent the stain in the dark wax from directly penetrating the Chalk Paint® more than you would like.
2. Using dark wax straight without cutting it – but blending it over a clear wax base that is still moist: Apply it over my clear wax while the clear wax is still fresh. Meaning, within minutes after applying the clear wax. Often people will do this when they have 2 layers of clear wax. The first application of clear has been applied and is dry. When applying the second coat of clear wax- this is when you mix the dark in. Again- I will stress- since I paint pieces of furniture to sell, layers of wax are very important regarding protection, so I am applying the dark wax immediately after my 2nd coat of clear wax has been applied. (My first layer of clear wax was applied and dried before doing this all) This process allows you to feather or blend in the dark wax strategically.
3. (Making a glaze) Mixing Mineral Spirit with dark wax before applying it: This method thins the dark wax and provides an easier application and additional playing time with the dark wax. (This is my preferred way of using the dark wax) The ratio of mineral spirits to dark wax is dependent on the end look of what you are trying to achieve. There is no right or wrong here. I don’t measure when I work – I just eye it, but I am going to guess that I would add a tablespoon of mineral spirits to a 1/4 cup of dark wax. For this method, take some of your dark wax and place a small amount in to another container and then, mix some mineral spirits with it. I almost always add a little mineral spirits to my dark wax and incorporate it well before I use it. Keep in mind- if the ratio you mix is 50:50, then you start to convert the dark wax to a glaze- which is also very nice to use. I apply the glaze in the same direction as my brush strokes and I use an old paint brush or wax brush. (actually, inexpensive Chip Brushes work well for this) After brushing on the glaze, I then wipe it off using a rag or cheese cloth and wipe with the grain of my paint brush strokes. Leave some of the thicken dark wax in crevices or grooves as so to accent the architecture. If you need to get a little dark wax out of the tin and push it into some of the carved areas or groove details- go for it. There is no rule about using straight dark wax and a glaze at the same time.
So, I encourage you to play with this method so you can build up some experience and determine which ratio you prefer.
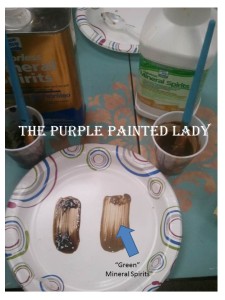
When making a glaze- I use Mineral Spirits. I also use Mineral Spirits to clean Annie Sloan Soft Waxes from my wax brushes. When you use Mineral Spirits cut the Dark Wax to make a glaze, I feel it is very important to NOT use the “green” (environmentally safer) brand of Mineral Spirits. It does not work right- instead of thinning the dark wax and cutting it cleanly making a nice stain, the “green” Mineral Spirits produce something that looks like a milky pudding.
4. Mixing the Clear Wax with the Dark Wax- (extends play time and lightens the hue of the dark wax:)
In a separate container, mix some of Annie’s Clear Wax with the Dark Wax. The obvious thing that happens – is that the color of the Dark Wax is lightened. Obviously- the more Clear Wax you add- the lighter the tone of the Dark Wax will be. Once upon a time – Annie offered three waxes. One was an amber color. But it just made sense to sell two instead, and then customers could mix them to any hue they wanted. A benefit of mixing Clear Wax with the Dark Wax- is that is seems to extend the playing time of the wax and it doesn’t “set” as quick.
5. Lastly, you can use the dark wax straight out of the tin and apply it to your Chalk Paint® without a layer of clear wax being applied. Keep in mind- the Clear Wax base adds to protection- but this option is fine for items that will have minimal handling, like picture frames or molding.
There was an incredible Bombay dresser at my shop that belonged to one of my customers and I had the honor of doing a custom paint job on it. It is a family piece and has sentimental value- I even found some postage stamps that were from Italy postmarked 1977 inside of it when I was cleaning it.

When it first arrived it was not in the prettiest condition. But it has come a long way. In the photo below- I still had the top and feet to finish, but so far- the body had been painted with Primer Red & Graphite Chalk Paint™ Decorative Paints by Annie Sloan. The dresser below also has been waxed with one coat of Annie Sloan Clear Wax. No Dark Wax has been applied yet.

It looks nice….but oh boy! It can be so much better …and all I needed to do was just apply Dark Wax to it!

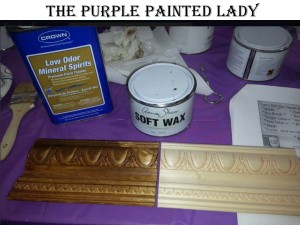
The Dark Wax adds depth and ages a piece perfectly! I love how the Dark Wax catches in the grooves and little “imperfections” which makes it look even nicer! Here are sample boards to highlight the look Dark Wax creates…which in my book …is gorgeous!

Graphite is a soft black – which I like to compare to a dark slate color. It is made with purplish blues, browns, and is not completely black. When waxed with Annie’s Dark Wax- the color becomes even more richer and warm as shown above. This is a popular color, especially when I am detailing a piece with vintage typography. I receive a lot of emails about this color. Again, I would like to clearly state- this is NOT black. It is a rich color – like dark pencil lead. It does have depth and interest- and clearly plays wonderfully with other pieces painted in a true black.
When decorating a room- try to avoid the whole “Matchy-matchy” approach. Layer texture, patterns and hues of color….including various shades of “black.” Just because you have a “black” piece- does not mean you need everything else to be exactly black. In fact- next time you are in a showroom of furniture- look at a room set up with ALL of the same black pieces…it can become quite …plain …boring, may even be a word I use to describe it. The matchy-matchy look creates minimal interest….it does not provide as much visual depth as a room with varied pieces. Again- have you ever gone on a home tour and seen a room where each piece of furniture is exactly the same finish…The answer is no!!! But- to clarify, one last time – (I promise)- Graphite is not black. But keep reading, because I give you steps on how to create a black!

If applying the Dark Wax straight over Chalk Paint – will darken it more since the Dark Wax stains the paint when no clear wax layer has been applied. BUT remember!!!!!- it is the layers of wax that give your furniture protection. I would suggest that you still apply the clear wax first to a piece that will get a lot of wear & tear and then- tint your Dark Wax as noted above to deepen the intensity of it even more. But if you have a piece of furniture or cabinets that will be handled a lot- it is best to still have a layer of clear wax. If it won’t be handled as much- one coat of Dark Wax is fine. And remember- Dark Wax is one of the last applications to be applied since if you apply clear wax over it- it will start to remove it.
2. Another tip is that I have had customers do- is bring their quart into their “other” paint supplier. (like Home Depot or Lowes or ….) and have them add 2 oz of black universal tint to the paint.
3. You can also add a little liquitex black tint to graphite to make it a true black. I have purchased mine at a store called Hobby Lobby. An awesome store with incredible furniture knobs, by the way!!!!
4. Mix India Ink into your Graphite. For a whole quart of paint- add 3 bottles of India Ink to Graphite, then mix really well together. Just a note of caution….the more outside ingredients you start to add to a product- it will start to play with the integrity…..but this is an option to use and I like the outcome! 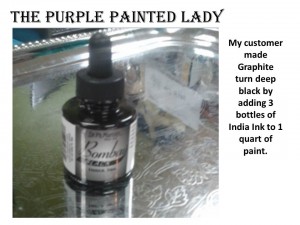


When I applied the Dark Wax to the sample boards above and to this Bombay Dresser, (take note) that there was already a coat of Clear Wax that had dried. Having a base of Clear Wax is important– especially when applying Dark Wax and wanting just a HINT of antiquing/aged effect – OR when applying Dark Wax over a light colored Chalk Paint™, like Old White or Louis Blue. I also feel that by having a base coat of Clear Wax- it is easier to apply the Dark Wax. It spreads smoother. The initial layer of Clear Wax first will also prevent the Dark Wax from “staining” the paint color. So, let the Clear Wax dry first, and then apply the Dark Wax. This will also allow you to have better control over your toning layer or antiquing effect. The layer of Clear Wax will also add more protection to your painted piece. So again- it is beneficial to take the time to apply the Clear Wax and let dry.

If you intentionally want the piece to be much darker…for example- many of you wish we had a pure black….so when you have a piece painted in Graphite and want to really darken the hue- apply the Dark Wax directly- skipping that clear wax suggestion above! Sometimes if I am unsure on how I want the piece to look- I will do a test spot on the back of the piece with only Dark Wax and no clear to determine if I like the look.
When I worked at the Boston Annie Sloan Workshop back in April, 2012…one of the trainers stated that you can leave the Dark Wax on UP TO 5 minutes (but no longer!- and the heat temperature where you are should make the number of minutes LESS) Meaning if it is very warm, do not let the Dark Wax sit long because it will start to thicken. After applying the Dark Wax, using a clean lint free rag (cut up old white men’s undershirts..or buy bags of rags at Home Depot or Lowes in their paint departments) – rub it all off. Always wipe off the excess wax of your initial wax application, almost buffing and you should not have the stickiness issue. At the Boston show in March, 2012- it was stated to wait at least 24 hours for the Dark Wax to cure and harden before adding another layer of clear wax for more shine. *** I personally found whenever I added Clear Wax over the Dark, no matter how long I let the Dark Wax cure- I would always eventually start removing some of the Dark Wax. I personally feel that Dark Wax should be your last step to your project. (Unless adding some French Metallic Gilding Wax on the edges- then that would be your last step.) Here is an example of what I mean about French Gilding Wax over Dark Wax: 
I know this dresser is not painted in Graphite, but it is an example of a piece I painted in Coco and then applied the Dark Wax directly to it (without a layer of Clear Wax.) 

When using Dark Wax- make sure to PUSH the DARK Wax into the little cracks or dents in the furniture so to capture the Dark Wax in the unique characteristics of your piece.
TAKE NOTE!!! A helpful hint that many stockists do- is that they cut the Dark Wax with Clear Wax prior to using. Mixing the combination in a separate container- you can do a 50:50 ratio – less or more- depending on how dark you want the wax. By adding Clear Wax – it smooths out the consistency and allows for better application and control. I sometimes say- that the Dark Wax seems less “gunky”- for a lack of a better words!!!
For this Bombay dresser- I actually added about a tablespoon of Mineral Spirits to some Dark Wax in a separate container to “thin” the Dark Wax just a smidge. When mixing the Mineral Spirits with Dark Wax- incorporate it really good. By adding a small amount of Mineral Spirits- I am thinning the consistency of the Dark Wax. I did not make a glaze or a stain with it. I find that by adding a small amount of Mineral Spirits it allows me to work with the Dark Wax more and it doesn’t dry or cure as fast. Meaning get too thick – too quickly.
As always- I recommend using a wax brush- and feel that a wax brush is worth its weight in gold! I sell the Ultimate Wax Brushes – to check them out on my on-line shopping cart- CLICK HERE. When I apply Clear Wax – I work in about 1 foot sections … I use a circular motion when applying the Clear Wax. Sometimes- depending on the piece- (except when going for that Rustic look or when you have a textured piece) I will apply the wax in the same direction as my painted brush strokes. Either way……..circular or not…. when I have finished waxing a whole surface- I ALWAYS complete a few clean wipes with my rag in the direction I waxed.
But when working with Dark Wax- depending on the final look I am going for- I often apply the Dark Wax in long strokes. What determines how I apply the Dark Wax is the end result I want on the piece. In this case- I applied the Dark Wax in long strokes to accentuate the curves of the Bombay dresser. I stroked from from top to bottom or bottom to top per side that I was working on. You can see the effect that it has in these photo.:

Receiving a photo of a finished piece The Purple Painted Lady completed in my customer’s home – is like eating a decadent dessert after a fine meal. I love taking a piece that may not have been quite that popular originally with the customer……… to a piece- that while their husband is touching or moving it out of my shop, they are instructing him “to be careful!” A true testament that both the piece and their value of it- has been transformed!!!!!
It looks beautiful Stephanie! Enjoy!!!!

I always recommended taking a Chalk Paint™ Workshop at a Stockist near you to become educated on the in’s and out’s (or should I say the correct way of using Annie’s products!) You will learn all the professional tricks of the trade and take your furniture pieces to the next level! All Annie Sloan Stockist go through a formal Train The Trainer- and are educated based on exactly how Annie Sloan suggests using her products. Taking a workshop is very beneficial!!!!
MAKING A GLAZE:
For this Bombay dresser- I thinned my Dark Wax. I don’t technically consider what I made a glaze- but it is the same concept – so please read on for instructions:
* Mix the Mineral Spirits to some Dark Wax in a separate container to “thin” the Dark Wax. IN THIS CASE AGAIN- I only added 1 tablespoon to thin it just a smidge.
* When mixing the Mineral Spirits with Dark Wax- incorporate it really good. Use the “regular” Mineral Spirits- NOT the “Green” kind which looks milky white.
By adding a small amount of Mineral Spirits- I am thinning the consistency of the Dark Wax. Again, I actually consider what I did – as thinning it – not making a glaze with it- since the consistency I had when doing this Bombay Dresser was not fluid.
I find that by adding a small amount of Mineral Spirits it allows me to work with the Dark Wax more and it does not dry or cure as fast. Meaning get too thick – too quickly.
It is important to understand that once you wax a piece of furniture, you cannot polyurethane over it! It will eventually cause a quality problem, I guarantee that! You can use a furniture oil…like Miss Mustard Seed’s Hemp Oil…and once fully cured, you can use wax over that, but not the other way around. (I don’t know why you would wax over oil, but just an FYI if you are considering it.)
As always- I recommend using a wax brush- and feel that a wax brush is worth its weight in gold! When I apply Clear Wax – I work in about 1 foot sections … I use a circular motion when applying the Clear Wax. Sometimes- depending on the piece- (except when going for that Rustic look or when you have a textured piece) I will apply the wax in the same direction as my painted brush strokes. Either way……..circular or not…. when I have finished waxing a whole surface- I ALWAYS complete a few clean wipes with my rag in the direction I waxed. But when working with Dark Wax- depending on the final look I am going for- I often apply the Dark Wax in long strokes. What determines how I apply the Dark Wax is the end result I want on the piece. In this case- I applied the Dark Wax in long strokes to accentuate the curves of the Bombay dresser. I stroked from from top to bottom or bottom to top per side that I was working on. You can see the effect that it has in these photo.: Receiving a photo of a finished piece The Purple Painted Lady completed in my customer’s home – is like eating a decadent dessert after a fine meal. I love taking a piece that may not have been quite that popular originally with the customer……… to a piece- that while their husband is touching or moving it out of my shop, they are instructing him “to be careful!” A true testament that both the piece and their value of it- has been transformed!!!!!
It looks beautiful Stephanie! Enjoy!!!!
If you have a stockist located near you- then I strongly recommended that you take a Chalk Paint™ Workshop. Annie’s stockist go through formal training that was created by Annie! No matter how many years of painting experience we each have- we are all educated on the in’s and out’s (or should I say the correct way of using Annie’s products!) Annie has high expectations for her stockist and wants you- the consumer to be able to get all of the functionality you can from her delicious paint! You will learn the professional tricks of the trade and take your furniture pieces to the next level! All Annie Sloan Stockist go through a formal Train The Trainer- and are educated based on exactly how Annie Sloan suggests using her products. Taking a workshop is very beneficial!!!!
Below is a page out of the BASICS Workshop I created at The Purple Painted Lady.
In ending- don’t be afraid of the Dark Wax! I suggest getting a couple small pieces from Goodwill or your basement…and experiment and have fun!
Lastly- if you have not done so already- please LIKE my Facebook page!!!! CLICK HERE to visit the page- then select the LIKE option in the upper right corner.

