Painting and having issues with:
Water stains bleeding through
Wood grain showing
Wood tannins bleeding
Painting with a “white” or light colored paint over Mahogany or Pine
Painting kitchen cabinets that have a lot of grain and it is causing tannin to bleed through? Or, even though you cleaned the cabinets well and rinsed off any cleaning products, you are still getting “grease” stains coming thru? Keep in mid, we promote Chalk Paint® as a minimal prep paint, but you have to be realistic and it is not a miracle. Especially when it comes to kitchen cabinets- where – personally I like to say, some people use their cabinets and some people abuse their cabinets. If the doors have a heavy grain, or are oak, or perhaps the pre-existing top coat has worn away …….especially on doors near the kitchen sink, or the cooking area near the stove or above it, next to the dishwasher where the door opens and hot steam is released or doors that get handled a lot like where you keep your drinking glasses – the pre-existing top coat may have been worn away. Keep in mind too, if using “white” colored paints…all of these issues above are a concern, but even more so – because again, “white” does not contain as much color blocking pigment.
Painting RAW WOOD and the paint is getting sucked up
Issues with the paint cracking or not adhering in a certain spot?
Painting a piece that you have sanded and now have different finishes visible
Planning on painting Pure White or Old White over a wood piece and concerned with stain or wood grain bleeding?
You used wood filler on a section and the paint is taking to it differently?
The piece stinks really bad of either cigarette smoke, a musty basement…or who knows what!
Painting kitchen cabinets and you are concerned of bleed through? Personally, I do not apply shellac – UNLESS I have to. It is extra work. If I get bleed through after my 1st coat of paint dries- then I will apply my 2 coats of shellac based on my instructions below. Shellac can be applied over chalk paint but not wax. So, wait and see what happens. And – you may only have bleed through on a couple of doors.
Please read this post:
Apply TWO uniform thin COATS of Shellac
2. Lightly sand after using to prevent paint from crackling.
3. Paint with Chalk Paint®
4. Wax
If you realize you need to shellac after applying Chalk Paint®- that is okay…go ahead and apply the shellac. Just remember you cannot shellac directly over wax!
If you have applied wax already, then you will need to lift the wax using mineral spirits.
Lightly moisten a rag and wipe your furniture. Wipe edge to edge- not circular. Also- make sure to NOT drip mineral spirits on to your floor. The rag should be moist, not dripping wet. The piece should feel almost like it did prior to waxing after removing the wax.
SHELLAC APPLICATION DIRECTIONS:
I prefer to use shellac in a container. Reason being- even with two applications using an aerosol can- I cannot guarantee that your coverage (thickness) is adequate.
Do not shake the shellac but rather stir it or roll the container in your hands prior or use a stir stick.
I use a lint free, cotton rag to apply the shellac. I usually take a rag and fold it into four’s. The I dip an edge into the shellac and wipe it on the piece in the same direction that I will be applying the paint. (usually the same direction as the wood grain.) By using a lint free rag- folding it like a hankerchief, then dipping the edge in- and wiping the shellac on – starting the farthest away from you. and wiping from one edge to the opposite side- you should have better coverage. The analogy I use – is that this is similar to washing your kitchen table. But always wipe in linear lines- not circular.
I prefer to use THESE RAGS (click here to link to the “better Than Cheesecloth” rags.)
Give the surface about 15 minutes to dry, and then repeat with a second, (uniform and thin) coat of shellac. Never apply it thick. That can lead to problems too. But – I often use the analogy, “Measure twice, cut once.” So, two uniform coats is best.
Having to apply shellac when painting with a “white” Chalk Paint® is sometimes necessary over certain surfaces – like raw wood, mahogany, heavily exposed grain.
WATERMARKS:
Ahh- the dreaded problem when you finally decide to paint a piece of furniture or even worse yet….kitchen cabinets and then……stains are bleeding through the primer and paint you have painstakingly applied. Or- what about that amazing piece you picked up at a garage sale for next to nothing- but OH BOY! It stinks! Either that musty smell from sitting in a damp basement, or the owner was a cigarette smoker. Or, did you use wood filler to “fix” some damage or did you decide to go from a “handle” to just a knob in regards to hardware and – you filled in the holes on the drawer fronts? Or, you have a hutch that your hubby built for you out of raw wood that has not been top coated? (that one is for you Laura!!) OR…you painted your piece with Chalk Paint™ and you now see bleeding coming through. Now what do you do?
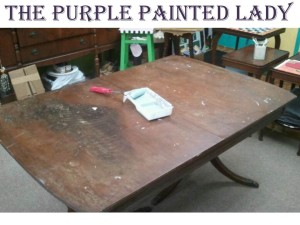
Here is a story true story of the progression of this issue with a trestle table that I recently painted for my shop, The Purple Painted Lady. A photo of her is below. Doesn’t she have great lines? I saw her and was in love and knew immediately how much potential she would have once she received a little TLC.:

First of all, at my shop I use and prefer specific products. Yes…I have used many products over the last decade, but just like make-up or soda pop, we are creatures of habit and usually stick to the brand that we like the most and that does the job for what our needs are. Now before I go on…here is a little disclaimer I wanted to add regarding this post. I am not endorsed or sponsored by this particular brand/company I am going to write about. But I can say that I always have a bunch of cans of this product in my shop for sale and for my personal inventory because it has been a life saver…and also a money and time saver for me. I do sell Annie Sloan Chalk Paint™ Decorative Paint Products, and that is because I love it and believe in all that it can do. I am passionate about what I do and will never link my name to a product that I don’t use myself and love! So AMEN to all of that!!!
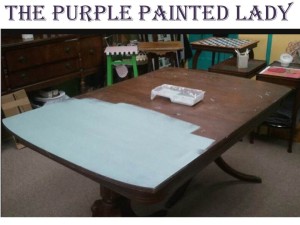
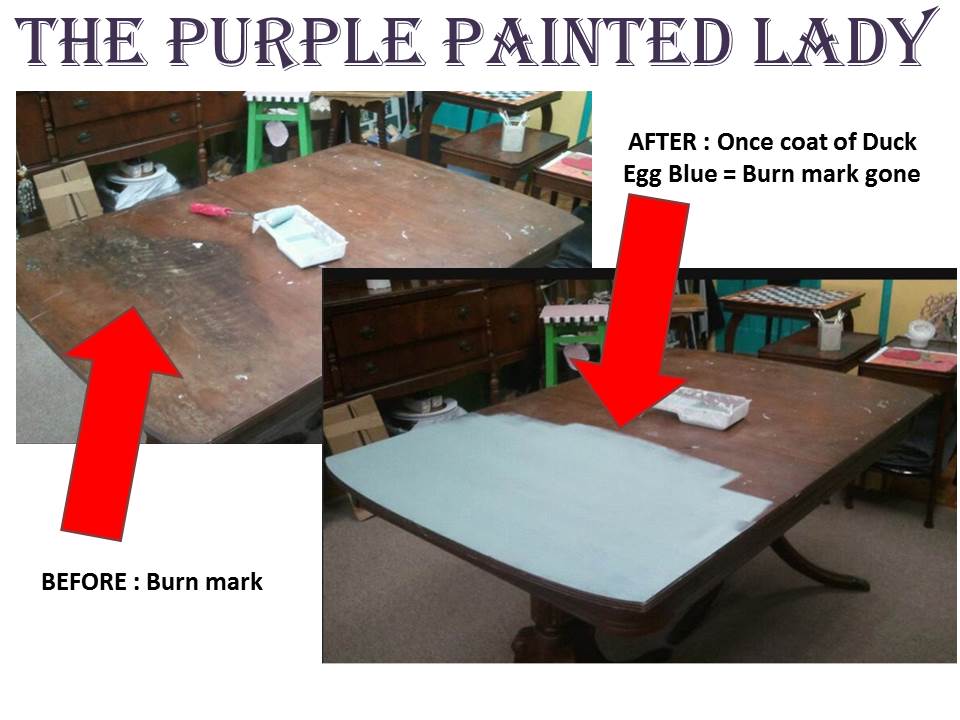
OK…with that out of the way- let me get back on track! So, you can see in the photo above a beautiful trestle table- but look close at the top if it. Now check out the image below and you can sadly see the water stains that bled through after beginning painting it. Foolish me…even “experts” (and I use that term very loosely) make mistakes. Again- if you look closely at the top of the unpainted table- it was quite obvious this was going to be an issue!

I totally knew I should have taken precautionary steps – but perhaps I was in denial. I don’t know, but either way- after that first coat of paint- reality hit me quickly and I did what I needed to do.
Ok, are you ready? Here it is…my secret to covering up water stains, that red stain wood that was popular in the 1930’s &, 1940’s , Mahogany colored stains or preventing wood tannins from bleeding through my painted pieces of furniture or cabinets. This is especially important if using a light hued color of paint…like white! It is…ta-dah…..using a spray shellac. Just like the one I have shown here.


As for the cabinets I referenced- you know the ones that have that yellowish wood stain color and you can see the grain of the wood. The wood tannins bleed through your paint like the photo above shows. To prevent the bleeding some people approach this problem by using multiple (meaning many!!!!) coats of a serious excellent covering primer (adding more expense to their project.) And keep in mind- that primer is NOT needed with Chalk Paint® Decorative Paint by Annie Sloan products! Lastly- just want to clarify- there is a functional difference between sealers and primers. So….here is something you can consider- my secret weapon using Zinsser.
 Make sure when using any product to read the manufacturer’s usage and safety directions first. Like most spray paint, polyurethane or shellac – this stuff has some serious smell to it. I always recommend- when possible to use this in an outside area or ventilated garage. Wear a mask and even safety glasses. (do I wear safety glasses? NO! But I should probably tell you due to some legal mumbo-jumbo!) But you do not want any wind or dust happening when using this stuff- or any spray paint, shellac or polyurethane. Because – like Murphy’s Law- if there is a breeze and dust….the dust or dog’s hair will end up on your piece. Also, (and I do this) …remember to take off that sparkly diamond ring you might be wearing or any other jewelry or watches, so you do not accidentally over spray them. When you spray your piece – use common sense “Spray Painting” techniques. Meaning- don’t hold the aerosol can in one place- you will get drips. Don’t hold the can too close to your piece either. Even movement, uniform coverage – and you will be just fine! After you have sprayed the piece (or brushed on the shellac) ….once the piece is dry – which is very quickly (like 5 minutes)- reopen the front and back garage door to get a cross breeze to air out your work space. It doesn’t take much time and the smell dissipates quickly and in the end- this will be all worth it!!
When you have stains and need to spray your piece, always spray the whole surface that contains the stain- do not just spot treat. Just to reiterate some important points: Get uniform coverage – do not just target the stain section. You wouldn’t think just a quick spot treat spray of shellac in only a small targeted area could be visible once painted, but it is! I am going to repeat that because this is important! Make sure when you spray the whole area of the piece! So in my example- I sprayed the whole top of the table. And feel free to do this twice. First, spray it once and let it dry which only takes 5 minutes. And I love the quick drying time because even the most impatient people will be impressed with this stuff! Next- spray another full second coat! When done using spray paint or a spray shellac- go outside and holding the can, flip it upside down and spray. You will see the spray in a few seconds will disappear and this ensures you that you cleaned out the nozzle and won’t have a clogged can next time you need to use it. Always do this before placing your spray paint or spray shellac away and you will never have a plugged nozzle!
Again, play it safe! Do this step outside if using the spray shellac since the shellac has a serious strong odor- but the smell goes away quick and dries in minutes.
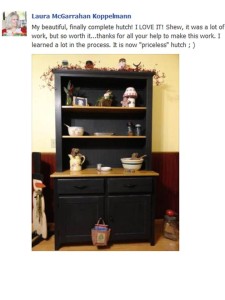
And just to reiterate this- when you have a piece of furniture made out of different types of wood- keep in mind – that when you paint- the color can appear differently. For instance… a wonderful customer of mine, Laura McGarrahan Koppelmann has a husband who is very skilled. he built her – from scratch a hutch! He used bead board and pine, and some other types of wood when constructing it. When she began painting it she had two issues:
1. The raw wood was just sucking up the paint!!
2. There was an obvious difference in the shade of the paint depending on which surface you looked at. The pine sides took the paint differently than the back bead board.
So, I emailed her this post regarding shellac. Laura applied the shellac right over her existing Chalk Paint® and repainted- and loved the outcome. She wrote to me, “My beautiful, finally complete hutch! I LOVE IT! Shew, it was a lot of work, but so worth it…thanks for all your help to make this work. I learned a lot in the process. It is now “priceless” hutch ; )”
YOUR PIECE REALLY SMELLS BAD!!!:
And although- I am mentioning this near the end here- this stuff is amazing for blocking out odors that may be coming from a piece of furniture. It seems when I spot the most amazing piece of furniture with incredible detailing at a garage sale, it always happens when I get next to it- IT STINKS! LIKE, “make you gag” stink. Either that musty smell from sitting in a damp basement, or the owner was a HEAVY cigarette smoker. I like to use the analogy that spraying the piece with Zinsser is like laminating a piece of paper. Water cannot penetrate through and get the paper- and that smelly odor – will be totally contained. ***Just make sure to spray inside the drawers and any surface you can…like underneath, inside drawer pockets, and inside cabinets.
I don’t think it matters what you use to clean or air out something that has been permeated with nicotine….. On a damp day- it will smell all over again. The only thing I have found to really work- is encapsulating the entire piece of furniture with Shellac. If it is a dresser- spray the Shellac in the cavities. Smoke gets everywhere!
Below is the same table after one coat of Zinsser Spray Shellac and a coat of Old White- which is a paint that does not require a primer to stick to the shellac. Doesn’t it look better? Again- what I did was spray it with the Zinsser. Then repainted using Chalk Paint®. And then – waxed.

Whenever I have to sand a piece of furniture due to damage of some sort. It could be due to a scratch, a dent, chipping. After sanding, the piece will have a variation of materials on one surface- like the dresser shown below. You can see the raw wood where we sanded. In this case- I also always spray that whole section with Zinsser Shellac. So in the example below- I would spray the whole top.:<br?

Again, this is wonderful stuff and if you paint lots of furniture… I recommend always having a can on hand. Or two, or three….!
Imagine when you go to paint those old kitchen cabinets that you cannot stand the color of. Save yourself time- just take the precautionary step and spray shellac all the doors after a good cleaning- and spray them twice. And don’t forget to brush on the shellac to your kitchen cabinet frames too.
The Purple Painted Lady just completed painting 40 cabinet doors for a home in Penfield, New York. We sprayed the cabinets outside prior to using Chalk Paint™ Decorative Paint by Annie Sloan. Sometimes with kitchen cabinets- even though they have a top coat of their own from the factory – after over 20 years of use…that breaks down. The stain from the cabinets in certain places can then bleed through. (It is interesting to paint cabinets- as an experiment prior to shellac. You will notice the stain that bleeds through is in a shape of a streak as if something splattered on the cabinets and then dripped down the front and it is the shape of a splatter or spot) You will often find this most near cabinet doors located near the dishwasher or kitchen sink where there is more water movement from washing dishes or emptying the dishwasher.


Another reason to use shellac: Painting Chalk Paint® over a previously painted surface that has some type of effect – will most likely pass through to the Chalk Paint®. This would happen no matter what type of paint you were using.
So for example—–
If you paint Chalk Paint® over a previously crackled surface- it will cause the Chalk Paint® to crackle.
If you are painting Chalk Paint® over chipping Milk Paint- that will still cause the Chalk Paint® to chip since the foundation beneath …the “Milk Paint” is still chipping since it has not “bonded” with the base surface.
In this case- I recommend that you sand back the milk paint or crackle lightly to accelerate any loose paint to come off or to remove the crackled surface. Then- blow off the surface of all dust and use Zinsser Clear Shellac (again, I like the aerosol cans- but you have to use it outside) and applit in a thorough coat over the whole piece. Possibly two coats. Shellac is very inexpensive and can be a life saver depending on the piece you are working on. I have a post on my website noted below you may want to read.
Anyway- I think this trestle table looks lovely now! Tomorrow this gorgeous table will receive a mix of Dark & Clear wax to showcase the “crocodile” textured surface around the front and sides.
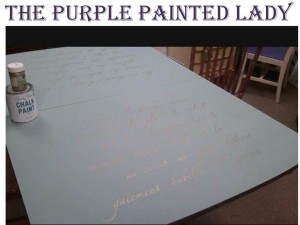
Okay- now here is a spin to all of this information! I personally think that I use shellac on about 20% of my jobs. If I am painting cabinets in a kitchen a=or a bath- they almost always get shellac. But using shellac is a necessity for many jobs and something to consider- is what color Chalk Paint® are you using in your project. Reason being – colors with more pigment will have better coverage. Below is a bunch of photos that are an example of that!
I picked up an old dining table for free. But it had a large burn mark on the top of it.
I thought I would need to apply Zinsser Shellac over it as so the paint would cover it, but thought I would experiment first and just try the Duck Egg Blue Chalk Paint® directly over the burn mark to see how it covered.
After rolling one coat over the table with a foam/sponge roller I knew that I did NOT need to use shellac since the Chalk Paint® covered the burn mark 100%. I am pretty sure though, if I had used Old White Chalk Paint® or Pure White Chalk Paint® this would not of been the case.
After I painted the table it looked so much better, but I thought it was a little plain. So I played around with a large stencil.

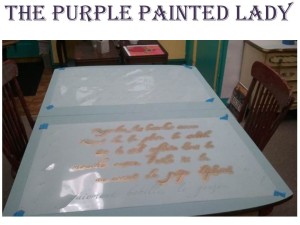
I think the table looks so much better now and learned quite a bit regarding coverage when using Chalk Paint® on this little project!
Well, I hope you enjoyed this not-so-little article- but isn’t that typical of me? Please write to me, “Dear Purple Painted Lady” with questions and you may be featured right here online! Any painting questions, color selection issues, or even design issues- send them on in. Please just write me at takuntz@rochester.rr.com and note in your subject, “Dear Purple Painted Lady.”
Until next week…. in the words of St. Francis of Assisi:
A woman who works with her hands
is a laborer.
A woman who works with her hands
and her head is a craftsperson.
A woman who works with her hands.
her head and her heart
is an artist.
Stay well!
Tricia Migliore Kuntz ~ aka…The Purple Painted Lady