The Purple Painted Lady® is always here to help her customers! (please LIKE my Facebook page by clicking on my business name to the left)
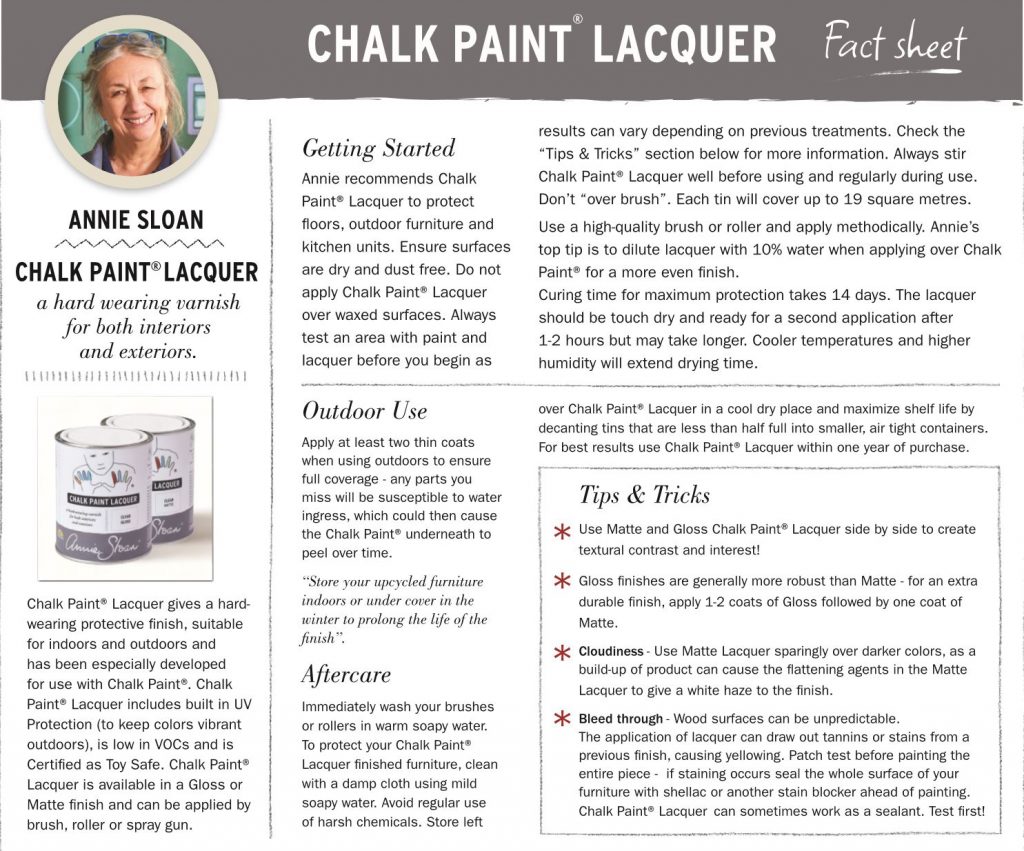
Annie Sloan Lacquer in the 750 mL containers comes in both a GLOSS and MATT.
Lacquer behaves differently than paint in regards to how you apply it and it is important to understand some specifics so we can help you be successful with your projects. So, if you are about to start a project- like literally…right now are going to use your Lacquer, stop reading and go flip your can over upside down to help get the flattening agents dispersed. You do not want to shake the can…..only stir it afterwards.
IF USING LACQUER OVER A DARK COLOR PAINT? => KEEP IN MIND…..as with any matte finish product, it is recommended that you use a gloss finish first , then apply the matte when going over darker colors. The flattening agents in the product that give it a matte finish will show as a cloudy look over dark colors. You have to cover with a gloss first. The other option is to mix the Gloss Lacquer with the Matt Lacquer in a one to one ratio in a container and then apply.
OR…….
MIXING A LITTLE CHALK PAINT® INTO YOUR LACQUER:
Some will add a little of their “dark” colored Chalk Paint® with some of their Lacquer to tint it. Seriously, mix a little of your Chalk Paint® with Matt or Gloss Lacquer for the first application. This is helpful with dark colored paints. Just add paint to the Matt Lacquer and mix it really well. Some will only add a tablespoon to the amount they will apply for the first coat. I have also received feedback that some have started with a 1 to 1 mix (paint with Lacquer) ~ then applied a second application with less paint mixed in or NO paint mixed in. Customers have stated that the Matt will be fine to use without applying Gloss first. We encourage you to experiment..
USING LACQUER ON A FLOOR IN YOUR HOME? => Annie always recommends doing a test with your Chalk Paint® Lacquer to each of the patch test areas. This is the really important step. Chalk Paint® alone will always cover stains etc; but it’s only when Lacquer is applied that any damage to the floor will become apparent. The chemicals in Lacquers which make it such a durable, hard wearing finish for your floor have the unfortunate effect of pulling stains and spills through Chalk Paint® and to the top of the surface, where a yellowing effect can occur. It is therefore crucial to apply Lacquer to all the tests to ensure no stains come through.• When they’re dry, check your test patches. If they look clean and clear, then you’re ready to paint. If they have yellowed or drawn out a stain; fear not!
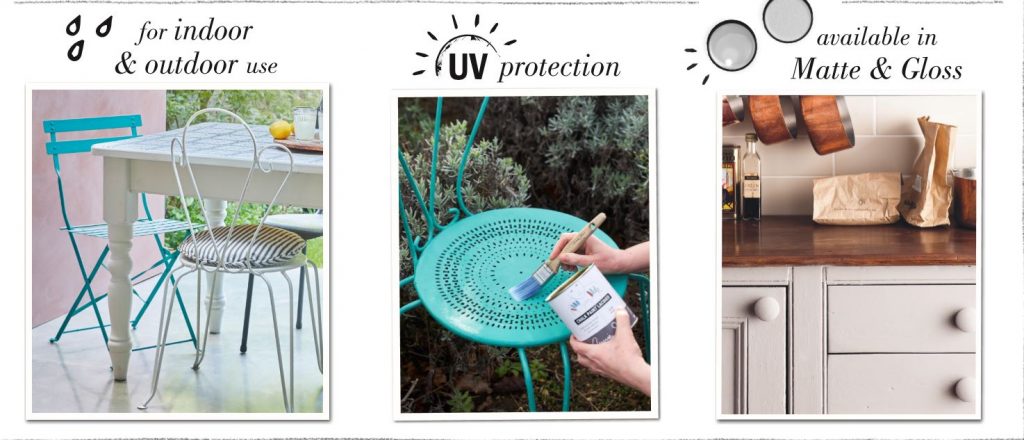
Using Annie’s Lacquer for OUTSIDE PROJECTS? CLICK HERE to read more about specifics …but read this whole post first!
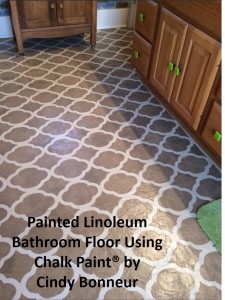
USING LACQUER ON YOUR FLOORS: If you are considering using Chalk Paint® decorative paint by Annie Sloan on your floor, no matter if it is concrete, linoleum, slate or wood – you will want to protect it using Annie’s Lacquer.
 If you own a container of Annie’s Lacquer and are reading this prior, as in literally- you are going to use it NOW…..stop and flip the Lacquer upside down and let it sit like that the whole time you read this! It will get the flattening agents at the bottom of the container loosened a bit! And when you are ready to use the Lacquer and take the lid off, use a stir stick to gently …and patiently mix all the good stuff together. You can not rush this important step.
Ok…….here we go! Using Lacquer however, is NOT like using or applying paint. There are some special steps and directions you should be aware of BEFORE opening your quart and using!
First and foremost- one thing I want to drill home is that if you OVER brush your Lacquer especially with the MATTE Lacquer when applying – it will look bad! Often you will get a white haze – professionals call this “flashing.” Moisture and humidity can cause hazing, blushing and Whiting. So, use the product at room temperature and if you are going through a serious wet season with lots of rain…consider waiting till the humidity levels are more reasonable.
If you purchased Lacquer from The Purple Painted Lady®….we included instructions…READ THEM CAREFULLY!
We suggest adding about 10% water to your first coat only. If you do NOT add water to the first coat – like we direct- it can look bad. Bad as in blotchy after your second coat has been applied and has dried.
So, please read all of our instructions! (did I stress that enough?!)
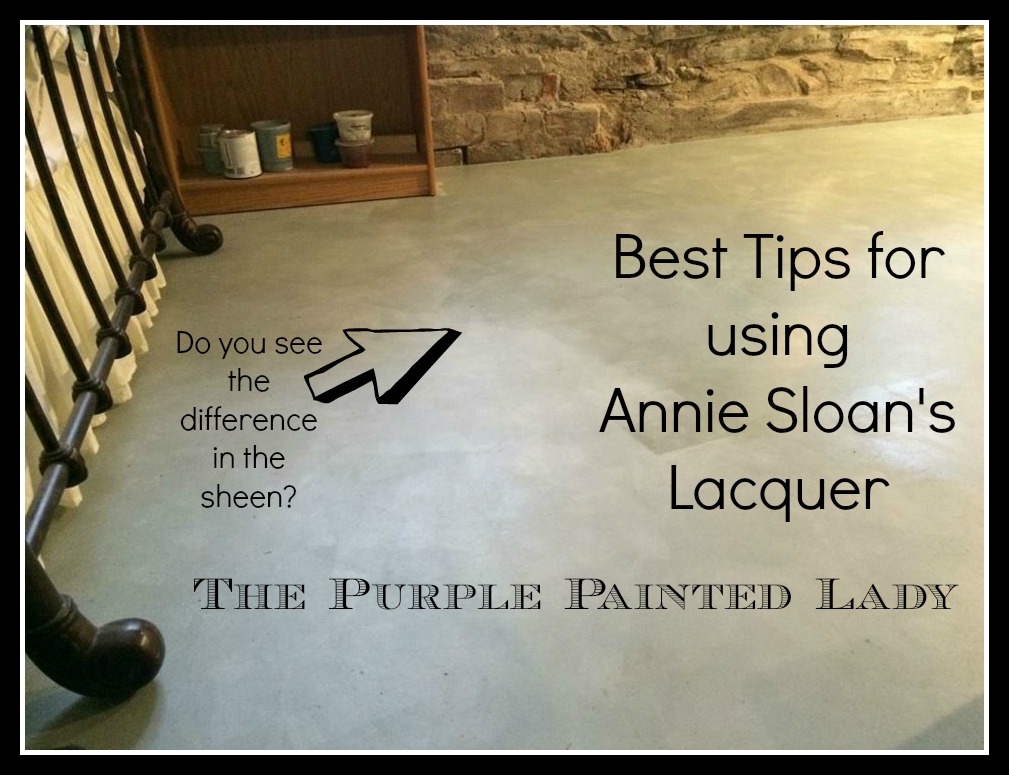
MIX THE MATTE AND GLOSS LACQUER TOGETHER: Here is an interesting tip- if you want more a satin finish, purchase both Gloss and Matte Annie Sloan Lacquer and mix them together. Mix them both really well in their original containers first. As in- like get that paint stick all the way to the bottom and around the outer edge . TAKE YOUR TIME when it comes to mixing. This is seriously- super critical! Once you have them both mixed super well independently…..then combine them together. And then, you guessed it…mix them really well AGAIN. And continue to mix them as you use the product!
WATER BASED: Annie Sloan Lacquer is a clear water based varnish that comes in both Gloss and Matte. It is a strong penetrating Lacquer meant to be used over wood, linoleum or concrete floors painted with Chalk Paint®. It is the penetrating characteristic which makes it so hard.
WHAT DOES A PENETRATING LACQUER MEAN?: Also- since it is strong penetrating Lacquer…. if painting over an old wood floor, you may want to consider doing a test spot painting and sealing the floor in an inconspicuous area to confirm that the “strong penetrating Lacquer” does not pull up wood tannins or yellow hues up through your paint – especially is using a “white” Chalk Paint®. If it does- then you may want to consider sealing your floor first with Zinsser bullseye Shellac. Shellac is meant for inside use only though.
Whether your paint is applied as a wash or applied solidly with a foam roller, this robust lacquer will seal it perfectly when directions are followed.
APPLICATION:
Always be patient when mixing your Lacquer! Flip your container upside down and let it sit like that for a few hours, if possible. Take your time once you have opened it and get a sturdy paint stick and scrape all the way to the bottom to mix in the flattening agents. Flattening agents can appear a bit sludge-like. KEEP MIXING ….you will eventually incorporate it all! YOU CANNOT RUSH THIS PROCESS!
THIN COATS! Always apply lacquer in thin coats. If applied to heavy and thick, clouding will result. Often customers will state after the first coat they see some slight lines in the lacquer if using a roller, but after the second coat is applied- it looks wonderful. (just sharing this so you do not panic) No need to sand in between either! Again, the Lacquer will slightly darken the paint beneath it.
The varnish is quick drying, non-toxic, low odor, and non-yellowing. The lacquer will give you a very durable scuff resistant finish. Because you can use Annie’s Lacquer for exterior use- it can be used in bathrooms. The one thing I would like to share – that is a bit awkward though to write about- is when using Lacquer on bathroom floors. If you have little boy’s in your home – who do not have good aim…per say…. it is important that you clean up afterwards since uric acid can impact some top coats.
Annie’s lacquer is ring resistant- meaning it can tolerate hot cups. It is also resistant to alcohol spills, which if using wax as a top coat- is not. However,… ‘resistant’ doesn’t always mean ‘proof’ …as in alcohol proof or like water proof…….. even resistant gives way from time to time … just ask my Spanx.
COVERAGE: The 750 ml containers will cover approximately 204 square feet (depending on how porous the surface and how thickly the lacquer is applied.) Two coats are recommended for areas of high traffic (never substitute one thick coat if in a hurry- it will not dry uniformly and you will just have issues- this rule applies to paint and for that matter – ANY product on the market!) I applied it on the top of a heavily used dresser and it was dry to the touch within minutes!
HOW TO USE: Before use, turn the container upside down for at least 1 to 2 hours since all the “good materials” that may have sunk to the bottom can get well incorporated again to the top and well dispersed.
STIR IT OFTEN: Can I just repeat that? STIR IT OFTEN before …and during use!
Also, this product should be stirred BEFORE AND as well as during using it.
DO NOT SHAKE the container of Lacquer since this will cause bubbles to form in the varnish which you do not want to happen!
It is best to gently mix the lacquer by rolling the containers around in your hands or pouring the contents into a bucket to stir. If Lacquer is not thoroughly stirred, the finish will be shinier due to the fact that the flattening agents weren’t completely mixed in. Note that the thick stuff at the bottom of the quart is the flattening agent, and that needs to be totally incorporated …So, be patient and mix it well….which if yours has settled, could take a good ten minutes.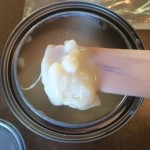
ADD WATER TO FIRST COAT ONLY:
It is advised to add about 10% additional water to your FIRST coat only. Second coat should be FULL strength- NOT watered down.
We recommend full strength for the second coat because most people do not batch their product, so if one container is mixed with 10% water and another is mixed with, let’s say, 15% water there will be a difference in sheen. The more water that is added to Lacquer the lower the sheen level becomes because the flattening agents are dispersed over a greater volume of product. A full strength coat helps to guarantee that the amount of flattening agents will be consistent throughout the project, therefore the sheen level should also be the same.
IF BATCHING ALL OF YOUR LACQUER INTO ONE LARGER BUCKET: However, should a customer decide to batch the product first and then thin with water, that would be okay but they should be aware that it will lower the sheen.
APPLICATION:
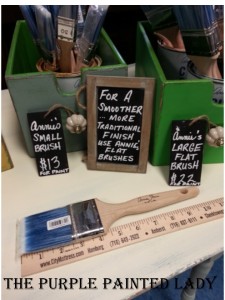
Apply the lacquer with a high quality sponge roller using a sponge brush to cut in at the edges. Or- if brushing it on…Annie’s 2 inch Paint Brush is great! Again- do NOT over play with the Lacquer. OR- another option is to have one person roll the Lacquer on using a roller, and another person go back over it immediately with Annie’s 2 inch Paint Brush . This will leave the lacquer with a clear and smooth appearance after it has fully dried
Apply two THIN coats for areas of high traffic such as a hallway, stairs, or sitting room but only one for a bedroom for instance. Again- it is best to apply two thin coats rather than one thicker one. You never get a head taking shortcuts!
Something to understand when using Lacquer is that it does not want to be back stroked. Confident strokes in one direction for an even sheen is extremely important because varnishes do not like to be back brushed. This can cause flashing…meaning an uneven finish. Thin uniform applications are extremely important over dark colored paints!
DO NOT STOP HALF WAY THROUGH A FLOOR: Always work off your wet edge when applying Lacquer. If using Lacquer on a floor- I feel it is important to paint the whole floor at one time and then…when you go to apply the Lacquer – you need to seal the whole floor with Lacquer all at once. VERSUS, dividing it in half and sliding furniture to one side and doing the floor in sections on different days because you will potentially see that break once all is done. Sort of like painting a wall red. If you do not do it all at once….you will see the “seam.”
CREATING PAINTED FLOOR CLOTHS
Annie’s Lacquer is perfect for floorcloths … non-yellowing, flexible, durable, scuff-resistant … a great addition to Annie world!
STENCILED WITH MULTIPLE COLORS AND NOW MY PAINT IS SMUDGING?
If your stencilled colour smudges, this can happen when a painter tends to over brush the Lacquer during application to get a ‘nice, smooth look’. The friction created by the back and forth motion of the brush can ‘wake up’ some of the underlying paint.
I APPLIED A “WASH” and the LACQUER REMOVED IT:
If you apply a wash technique …for example- you thinned your Old White Chalk Paint® with water to create a wash effect over a wood dress and when you applied Annie’s Lacquer – you felt it removed it. The same rules as noted immediately above about over brushing can apply here but there could be another reason this happen. Wash techniques are created by mixing water with the Chalk Paint®, making the paint translucent. If the wash is too sheer, the addition of a clear protective coating, in this case Lacquer, will make the wash appear even more translucent. Sometimes even creating the illusion that the wash has come off. Using Annie Sloan’s Clear Wax can have the same effect. So, you may want to consider doing a small test application with your wash and let it dry to determine the best concentration …or amount of paint in the wash so aesthetically, you still after you have applied your topcoat.
AFTER I APPLIED MY ANNIE SLOAN LACQUER, THE PAINT BLISTERED:
If you experienced some blistering to the Chalk paint® after you applied the Lacquer that is a sign that either the underlying paint layers are not completely dry or there is inherent moisture in the substrate. Making sure the paint has completely dried or the piece you are working on – has also been in a place with minimal humidity or moisture is important. It really shouldn’t matter if you dampen your brush first when using Lacquer. For the first coat of the Lacquer application, adding 10% water to the Lacquer is advised, but if you are in a state or place that is extremely dry…for example, like Arizona or Utah, we can understand why you might need to add a bit more to adjust. ANother reason for adding a bit more water, is that whatever you are working on – is very porous surface …like concrete…….or perhaps, it is just your personal working preference. Whatever your reason, it is best to not exceed adding more than 20%. water to your Lacquer for the first coat.
MY LACQUER HAS A PINK, BLUE OR YELLOW TINT TO IT:
 All water-based clear coat products will be look milky or translucent while still wet. I’ve seen blue, pink (see photo to right), and yellow undertones in the wet mix across different product lines. This shouldn’t really matter, though, because if applied properly the milky appearance and any undertones should disappear once dried. I find that the Lacquer will often have a milky white-blue hue to it before using.
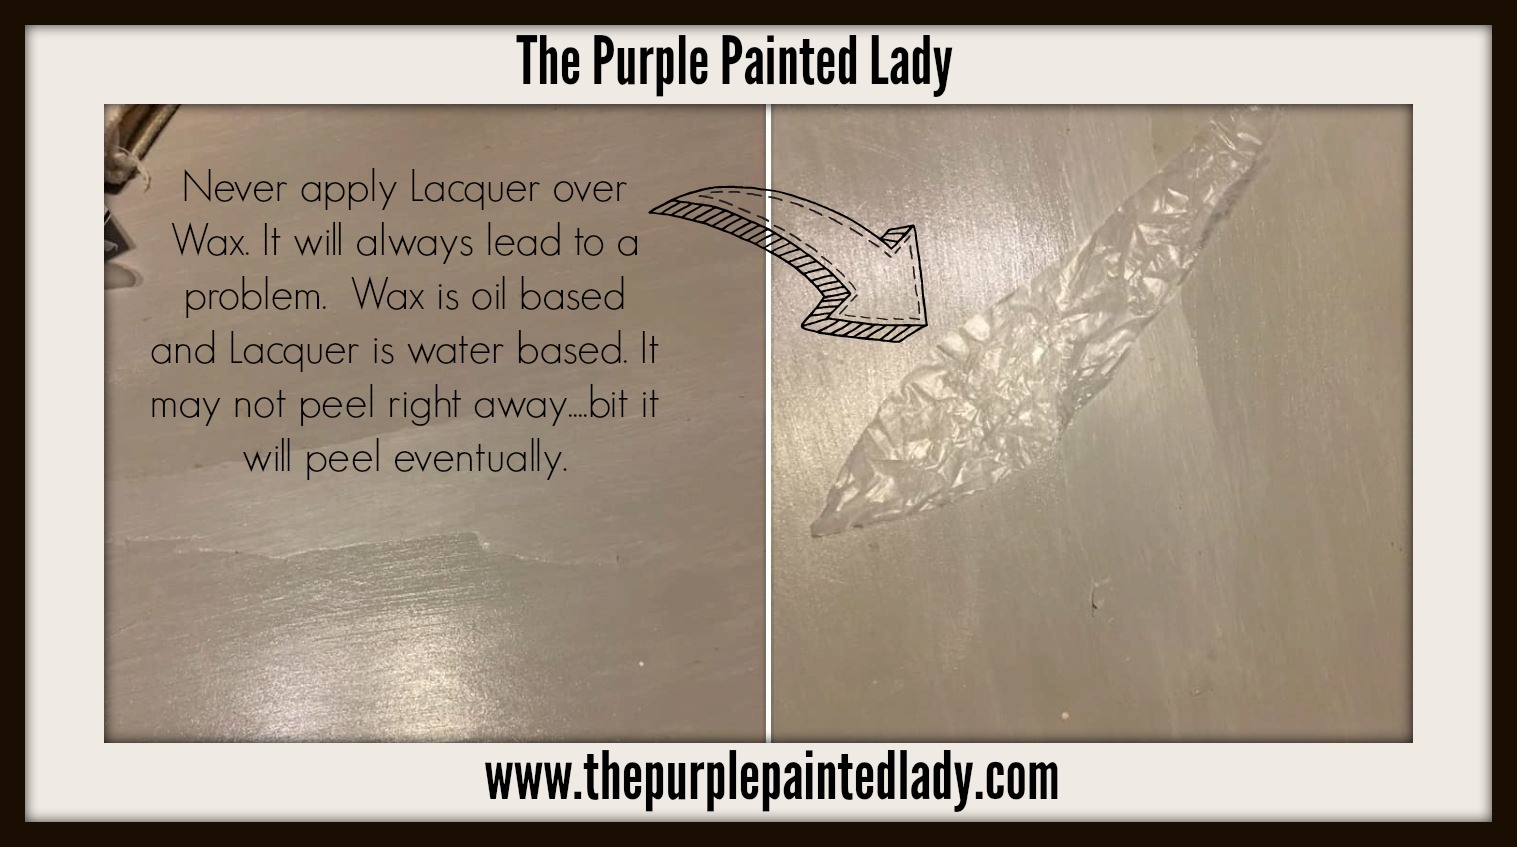
CAN LACQUER GO OVER WAX? NO! Lacquer, being a water-based material, will not bond to the wax which is an oil-based product. If you apply Lacquer over wax- it will probably peel away. It may not happen right away, but it will happen. : ( Do yourself a favor and don’t do it.
DRYING TIME: (HOW LONG TILL I CAN WALK ON IT?)
It dries quickly – but allow your floor or furniture piece to cure overnight before using. And even then- do not drag furniture across a freshly painted or sealed floor. Recruit some strong help and carry or lift pieces into place. An average coating needs to dry 1- 2 hours BUT if it has been rainy or damp where you live- this will take longer before another coat can be applied.. Do not try to rush it. There is chemistry in paint products and it is going to take all the time its needs, no matter how impatient you are!!! Leave it overnight to “cure” before walking on it. And initially- only walk on it in socks- NOT stilettos (high pointy heels) or hard soled shoes. Give the Lacquer a couple of days before the kids ride the big wheel across it too and again, DO NOT DRAG furniture. Carry and place it in position! Lacquer is a very strong and durable product but this finish needs enough time to cure (water-based products typically need 14 – 28 days to cure). If using in a bathroom environment, always wipe up standing water from shower or bath. I recommend this too if you have a wood floor.
If you are doing a bathroom and have little boys, …or big boys who lack aim skills, make sure to have a carpet in front of your toilet bowl. (Sorry to write this, but I want you to be happy with the products performance and urine can be acidic.) I recommend this too if you have a wood floor.)
LACQUER CAN CAUSE PAINT TO DARKEN SLIGHTLY:
The Lacquer when applied properly, will slightly darken the color beneath it with a matte finish that has a slight sheen to give it strength.
CAN THE LACQUER YELLOW?
It is impossible for any water-based varnish (Annie’s Lacquer is a varnish) to yellow. However, Annie Sloan Lacquer is a strong, penetrating varnish and it has been known to pull up underlying tannins from the wood, causing a yellow staining effect over light colors. This will only happen over wood cabinets or floors and not on every species of wood (mostly pine, oak, and mahogany). This can happen when applied over new unsealed pine/ oak floors or old floors with broken down polyurethane top coat. Lacquer shrinks down into the surface as it dries, pulling any tannins and bleeding stains with it. Some may shellac the floor prior and seal it to prevent this bleeding, paint with Chalk Paint®, then apply Lacquer.
LACQUER MADE MY DARK PAINT LOOK WHITE:
If you have a problem with Lacquer turning your paint white after applying, it is because it was applied too thickly – this causes the flattening agents in it to appear as a milky area. Unfortunately, the only fix is to repaint. So, follow my directions that I provide to you when you purchase Lacquer from The Purple Painted Lady
LACQUER vs POLYURETHANE?
Please allow me to quote Annie Sloan … ” I hate polyurethane with fierce and fiery passion. It has a plastic-looking finish, it scratches, and it changes the color too much for me … polyurethane does not adhere to the paint; it sits on the surface … like a plastic sheet.”
CONCERNED ABOUT BLEED THROUGH WHEN USING “WHITE’S”?:
Is your project on a piece that is pine and oak or mahogany or cherry? You will want to consider applying Zinsser Bullseye Clear Shellac over it prior to painting and sealing it. Bleed through can sometimes happen over certain species of wood when sealing with Annie Sloan Lacquer, particularly pine and oak. It’s most noticeable when using lighter colors of Chalk Paint®- like Old White, Purple White or Original White. Lacquer is a strong penetrating varnish that “drills down” through the paint layers, giving the finish a lot of strength, but it can also pull out the tannins as it dries.
BLEED THROUGH AFTER APPLYING LACQUER:
(Read previous note and then) You should apply one or two thin coats of shellac and then repaint and seal. It’s the only way to correct this situation.
CLEAN UP OF ROLLERS:
Wash brushes/sponge rollers thoroughly in water.
HOW 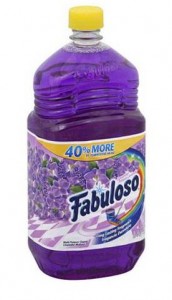 TO CLEAN A FLOOR FINISHED WITH LACQUER:
We recommend a product called Fabuloso. You mix it water and you do not let it pool on the Lacquer.
Note that Annie’s lacquer is NEVER applied over waxes! However, you can apply Annie Sloan’s soft waxes over the lacquer. Call Trish with ?s 585-750-6056
APPLYING THE LACQUER OVER A PREVIOUSLY FINISHED FLOOR?
Make sure to know if the previous poly is water-based or oil-based? Annie’s lacquer cannot go over oil-based. Better to stick with the original coating for both compatibility and matching sheen level. Also, if it is a new unsealed pine/ oak floors – you will want to seal them with clear Zinsser Bullseye Clear Shellac OR if the floors are old with broken down poly… a thorough sanding may be needed and the two applications of Zinsser Bullseye Clear Shellac. Please read this post HERE on using Shellac
HOW TO TEST IF THE PREVIOUS POLY WAS WATER BASED OR OIL BASED:
To determine if the previous finish is water-based or oil-based…..just rub a small area with a rag and a bit of mineral spirits. If the finish softens and a bit of color comes off, it’s oil-based. This means- do NOT use Annie’s Lacquer.
STORING LEFT OVER LACQUER:
A general rule of thumb … if stored properly one to two years … which is typical for most water-based clear coat products.
PACKAGING CHANGED in 2019. DIFFERENCES IN THE 750mL vs 1000mL Lacquer Container:
- the coverage per square foot has increased. The 750mL containers will cover approximately 200 sq ft the 1000ml was specified to cover 100 sq ft. (I know what you are thinking, less Lacquer but more coverage…but that is correct)
- the 750mL can be used on BOTH inside and outside painting projects
- there is a UV protector
- it is certified “Toy Safe”
- Gloss is now available as a sheen
Painting floors and floorboards is easy with Chalk Paint® by Annie Sloan! Chalk Paint® is an extremely functional furniture paint that can be used on almost any surface; making it the perfect solution to update and refresh floors.
- • Firstly, you should always test how Chalk Paint® and Chalk Paint® Lacquer will perform on your flooring. Floorboards are often old with no previous known history of exposure to varnishes, spillages or stains. When you apply Chalk Paint® Lacquer to a surface it can draw out old stains from your flooring, through the Chalk Paint®, and mar your finish.• To test the flooring, apply two coats of your chosen Chalk Paint® colour in a few small areas. Annie Sloan recommends testing several different areas of the floor to give a better estimate of its condition: some areas may have different stains or additional water damage.• Once dry, apply a coat of Chalk Paint® Lacquer to each of the patch test areas. This is the really important step. Chalk Paint® alone will always cover stains etc; but it’s only when Lacquer is applied that any damage to the floor will become apparent. The chemicals in Lacquers which make it such a durable, hard wearing finish for your floor have the unfortunate effect of pulling stains and spills through Chalk Paint® and to the top of the surface, where a yellowing effect can occur. It is therefore crucial to apply Lacquer to all the tests to ensure no stains come through.• When they’re dry, check your test patches. If they look clean and clear, then you’re ready to paint. If they have yellowed or drawn out a stain; fear not! Here are your options:1. Use a dark Chalk Paint® colour such as Graphite, Aubusson Blue, Athenian Black, Amsterdam Green or Oxford Navy. Here, Annie has demonstrated with Chalk Paint® in Athenian Black. A stain previously showing through Old White does not come through on the black paint. This is a quick and easy solution to the issue, although we would still recommend testing the darker colour for reassurance. 2. If you want to stick with your initial design plans for a light Chalk Paint® colour, your course of action should be to apply a stain blocker to your flooring. These usually come as either transparent or opaque and can be purchased from most hardware stores. Annie prefers transparent stain blocker. Apply all over your floor, and then follow the next steps. • Once you have done all your relevant testing, what’s next? Make sure your floors are clean! Use warm soapy water and a sponge. Do not use products containing harsh chemicals such as bleach when pre-washing your floors, as these can prevent Chalk Paint® and Lacquer from performing properly.• Application! You can either use a paint brush or roller to apply Chalk Paint® and Lacquer to your flooring, but many people find a roller easier.• TOP TIP: try an extending handle or even attach the roller or brush to a long stick to save your back and posture during the painting process.• Start by painting the edges of the room, applying Chalk Paint® with a brush along all the sides and corners, cutting in a few centimetres. Then paint the rest of the floor. Depending on the colour you’ve chosen you may need two coats of paint. Apply the second coat in the same manner as the first.•TOP TIP: Start from the furthest point away from and work backwards towards the door so you don’t literally paint yourself into a corner.• Once the Chalk Paint® is completely dry, apply Chalk Paint® Lacquer. Stir the Lacquer thoroughly before use. Apply in the same manner as Chalk Paint®; using a brush for the edges and a roller or brush for the middle section. The Lacquer is faster drying than Chalk Paint® so be sure to work semi-quickly and be aware of over brushing. Try not to brush or roll over drying Lacquer as this may drag the finish.• Chalk Paint® Lacquer is available in both a Matt and Gloss finish. Gloss varnishes /lacquers are always stronger than matt because the additional matting agents can affect the strength of varnish. Both finishes will work, however do bear this in mind if your floor is a particularly high traffic area. The matting agents in matt lacquers can also sometimes cause a cloudy effect on darker colours. Therefore, if you are applying Matt Lacquer onto a dark colour we would suggest a coat of Gloss first.• We advise applying two to three coats of Chalk Paint® Lacquer for full coverage, strength and peace of mind. The more coats the better! Leave plenty of time between coats for the Lacquer to fully dry. Once touch dry, the Lacquer will go through a further curing process over about 14 days where it will fully harden. You can use the floor during this period but please be gentle with it.
BUY PRODUCT FROM …..THE PURPLE PAINTED LADY™:
First- if you have a local stockist- go visit them and build a relationship with them. Go to them with your questions and project issues. BUT- if you do not have a local stockist- we invite you to try our customer service!
XO
The Purple Painted Lady®
PLEASE VISIT OUR TWO LOCATIONS!
our MAIN STORE at 77 West Main Street in Macedon, NY 14502

OR
3200 West Ridge Road in Rochester, NY 14626 (The Shops On West Ridge)
