I have received a bunch of questions pertaining to the Bombay dresser that I posted on my Facebook page back in Feb. 2012 where I did a Coco wash over Antoinette. (see photo below)

You might remember this one since it had that pretty pale gold French poem stencil across the front! Ooh la la! Anyway- back to the wash “how to”…the type of paint you use for doing a wash is VERY important.
I am focusing on Chalk Paint® Decorative Paint by Annie Sloan here because that is my favorite paint and because of that….. it is what I sell in my shop and use when I want a velvety, silk-like finish. (Now don’t get me wrong- I still use Latex and love it depending on the end product I am going for – but try making a “wash” with latex…I would like to stress the sarcasm meant with that comment!)
This dresser was probably purchased at Sears back in the 1970’s. You know this style …because every little girl had a bedroom suite like it. And these pieces often had a laminate style top- which this one had. So, without any sanding or priming- I first painted the French Provincial dresser using Chalk Paint® in the color Antoinette. You can see what the surface looked like originally in the photo to the right. 
I love pink- but felt this piece needed a bit more. So, the stencil, “Spring Time in Paris” from Royal Design Studio is fantastic!
Springtime in Paris Stencil Set
And since this is a French Provincial style dresser, painted in Antoinette- it seemed appropriate to use a stencil written in French.
Now this is a big stencil. It is really meant for the wall or floor.  The dimensions are 51.75″ w x 21.5″ h. Made from reusable 10 mil mylar which is very substantial and can take long term use! Now, this stencil comes in 2 parts. Use both parts to complete the whole stencil. Based on the size of my dresser- I only used the first half- which means if you speak fluent French- you will read only partial sentences. (but shh! Since most of us won’t ever know that)

Using a little Modern Masters Metallic Gold- (Click HERE to purchase) I carefully blotted the lettering and stenciled the front. Just a small amount of Modern Masters Metallic Pale Gold will do it!  I use an inexpensive stencil brush that you can pick up at any craft store. Get paint on the brush and then blot some off…remember we are stenciling and do not want to have that much paint on our brush that it squirts under the stencil. Then with a vertical up and down motion- I blot the stencil. When it comes to stenciling- here are some tips to help you:
Stenciling Tip 1: Use a Professional Tool
Stenciling brushes are round with short, stiff bristles. Use it in a quick up-and-down movement to dab paint onto your stencil. This helps prevent paint getting under the edges. Never apply in a circular motion. A sponge or small roller works well too, but I prefer the brush.
Stenciling Tip 2: Work from The Outside
Start panting on the edges of the stencil, working into the center, rather than from the center outwards. Again this helps prevent paint getting under the edges as you’re less likely to accidentally bump the brush against an edge.
Stenciling Tip 3: Less is More
Don’t overload a brush with paint as it will bleed under the edge of the stencil. Load the brush lightly, so that the ends of the bristles are covered evenly- blot or wipe off any excess on a piece of paper or cloth.
Stenciling Tip 4: Think Thin
You will get better results by applying two thin coats rather than one thick one. Wait for the first to dry before applying the second. Do not remove your stencil until you are absolutely sure you are done.
Stenciling Tip 5: Get Sticky
Keep a stencil in place by taping it at the top and bottom with a piece of tape. Painter’s Tape works best as it’s very easy to remove and should not pull off any paint from the surface.
Stenciling Tip 6: Go Multi-Colored
To use more than one color in a stencil, use tape to mask off areas of the stencil you don’t want in a particular color so you do not forget and get carried away with the wrong color.
Stenciling Tip 7: Practice Makes Perfect
If you’re using various stencils together, first try it out on a piece of paper. It’s far easier to find out that something isn’t working at this stage versus having to try to correct it when you’re painting on your final surface.
Stenciling Tip 8: X-rated Stencils
Old x-rays are great for cutting stencils, so if you were unfortunate and have some – put them to good use.
Stenciling Tip 9: Wash Regularly
If you’re doing a repeat design, wash your stencil regularly in warm water to keep the edges free of paint. If there’s some paint on an edge, you won’t get a crisp edge to your painted stencil. As paper stencils don’t lend themselves to washing, acetate stencils are better for repeat designs. With a paper or card stencil, wipe off the excess paint, then leave the stencil for a bit so the paint on it dries, before using it again.
Stenciling Tip 10: Store stencils Flat
A stencil, obviously, needs to be flat to be usable. To stop it from buckling, put it between two pieces of cardboard and store it somewhere flat.
After finishing the stencil- I still felt the dresser needed something. So, at this point- I thought I would do a wash using the Coco.
To make a “wash” – I first pour some Chalk Paint® into a plastic cup. A “wash” goes a long way in regards to coverage. For this dresser I used about a half cup of the Coco Chalk Paint™. I then took my Sharpie marker and made a line on my plastic cup noting how high the paint was in it. I did this in case I needed to make more.
Next…using a teaspoon add water to the paint-one teaspoon at a time (remember to measure and note the amount you add)….less is best since you can always add more water. The mixture of water and paint should begin to thin out. (Keep your paint:water ratio written down in case you need to make more!) The thinness or viscosity of the paint will be based on your preference. No recipe or rule here- but remember this is a “wash”– if you wanted to paint the piece- no need to add water. I added only a few teaspoons for my Antoinette painted dresser.
When I applied the Coco wash to the Antoinette dresser- I brushed it on with a cheap chip brush versus a heavy Purdy bristle brush. I laid the brush in its normal position…but used more of the tips versus the whole brush. Immediately next, I used a clean, lint free rag and wiped off the excess. That’s it- pretty simple, huh?
You do not want too much of the wash on the brush= enough to cover but not enough to cause dripping. I took the drawers out of the dresser and set them individually on their back as so to not have gravity work against me….like I show in this photo:
You can make a “wash” that goes on over a piece that has already been waxed or not waxed. I prefer doing the wash before I apply a coat of wax…but that is just my preference.
A wash makes for a real beautiful translucent effect! Let dry and then wax as normal. This is a great way to make a piece richer- which I think I did to this dresser.! OR…perhaps you want to try a bold color like Barcelona Orange, but are too chicken to “go for it”…I would suggest trying it in a wash first. It seems to be a more conservative approach and feels safer! And why buy glazes when you can do something similar but in any Chalk Paint™ by Annie Sloan!
HOW TO DO A WASH TECHNIQUE:
Try this “wash” effect with a color like Duck Egg over Old White….or French Linen over Graphite, Provence over Old Ochre OR just Old White “washed” over natural wood! There are no rules- but I hope the following helpful hints make this project idea more do-able for you! Please keep in mind the following….
1. Always note the water to paint ratio in case you do not make enough to finish the whole project. (can I stress this any more? But I learned my lesson once and ended up goofing up a piece over this simple rule! Learn from my mistake!)
2. Brush on the wash in strategic brush strokes–meaning keep your lines straight and clean
3. Be cautious not to drip on areas of the furniture you are not currently washing
4. Put a drop cloth down if doing this in your home…you will drip some on the floor.
5. Place your cup with the wash on a paper plate to keep work surface clean
6. Apply wash in small sections and wipe off – then move on to the next section. During the wiping off process- be careful to not have “rag blotch marks.” Start at the top and wipe off in clean, even pressured strokes all the way to the opposite side. Do not stop half way or go against the direction you want the streaks in. Never go in circles with the rag. If your rag becomes too saturated- get a new one.
7. I used a chip brush to apply- I like the streaky effect from the bristles.
8. Plan twice, “wash” once. Meaning- know your piece and your plan on how you are going to approach the project…top first, then sides.
9. If you are just trying a wash for the first time (or 2nd or 3rd) – it is best to do this on a piece that is smooth across. Meaning- not raised panels, or with carved details.
10. Always wipe off your wash in the direction of the brush strokes. Never do it in circles- it will look a mess.
11. Never place your rag down in the middle of a wash. Gently wipe from one direction to the other- otherwise you run the risk of leaving an imprint of the rag in the middle of your painted surface.
12. If you get a wash in a spot that you did not want…don’t fret. Let it dry- then gently sand it off using some 400 grit sandpaper.
And lastly- if you purchase the stencil I wrote about above – let me know your thoughts. I guarantee you will love it! And if you try this- please post a photo of your before and after on my FB page!
Here is another project I did a little wash on- for this project however, I was a bit more strategic in the location of where I applied the “wash.” I was going for the quintessential “Beach” feel – so a I used Old White to make my wash. I literally- dipped the tips of my brush into the paint that was on the paint can, and then dipped the bristles into a bit of water. I strategically brushed on the “wash” over the Duck Egg Blue dresser and then- using a cheesecloth, wiped some off. Always wipe in the direction you painted. (ps….the camera on my phone is quite mediocre – this looks much nicer in person!)Thanks for reading!

BEFORE WASH

AFTER APPLYING A WASH


If interested in purchasing Annie Sloan products, please visit our website if interested in ordering Chalk Paint®. We have Chalk Paint® available for $34.95 per quart every day, we offer low/flat rate shipping and it always ships same day (as long as Pete, our UPS guy has not come already!)
In fact- there are many reasons we think buying through us is the best. Read THIS little post about what sets The Purple Painted Lady apart from the rest.
To visit our on-line store- click HERE.
Lastly, we share a lot more information to help you get the most functionality out of your Chalk Paint® on our Facebook page. Consider checking it out by clicking HERE. While there- kindly consider LIKING us.
Thanks again,
Tricia Migliore Kuntz ~The Purple Painted Lady ~
Design/Consulting, Kitchen Cabinet Refurbishing, Custom Painted Furniture, Chalk Paint® & Miss Mustard Seed Milk Paint Retailer & herRochester Blogger
PHONE: 585-750-6056
Come visit us:
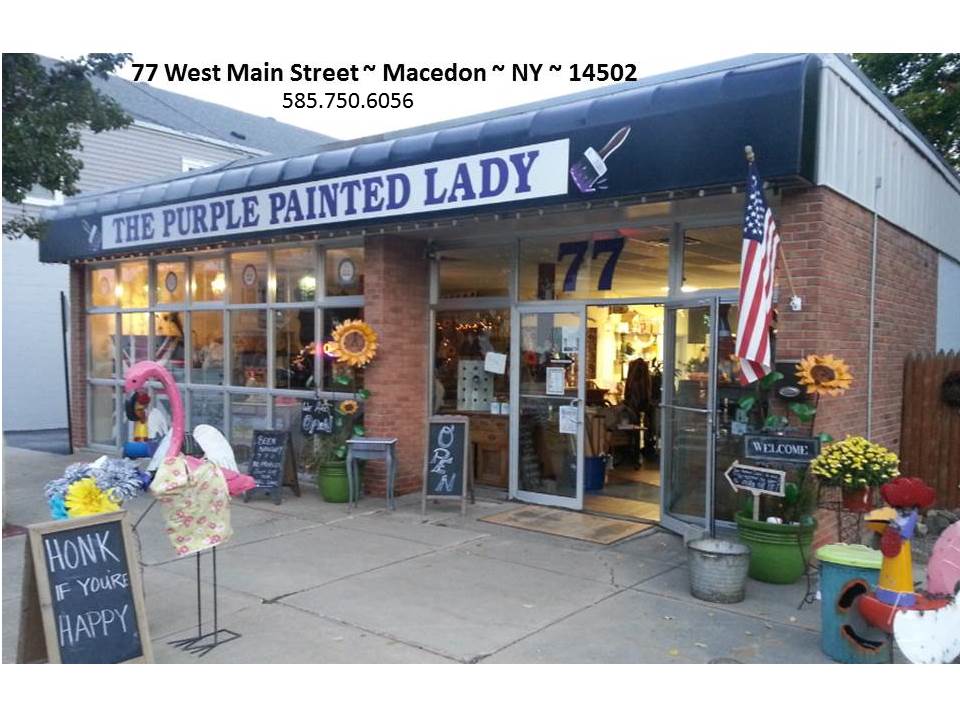
At our MAIN STORE at 77 West Main Street in Macedon, NY 14502 OR
3200 West Ridge Road in Rochester, NY 14626 (The Shops On West Ridge) OR
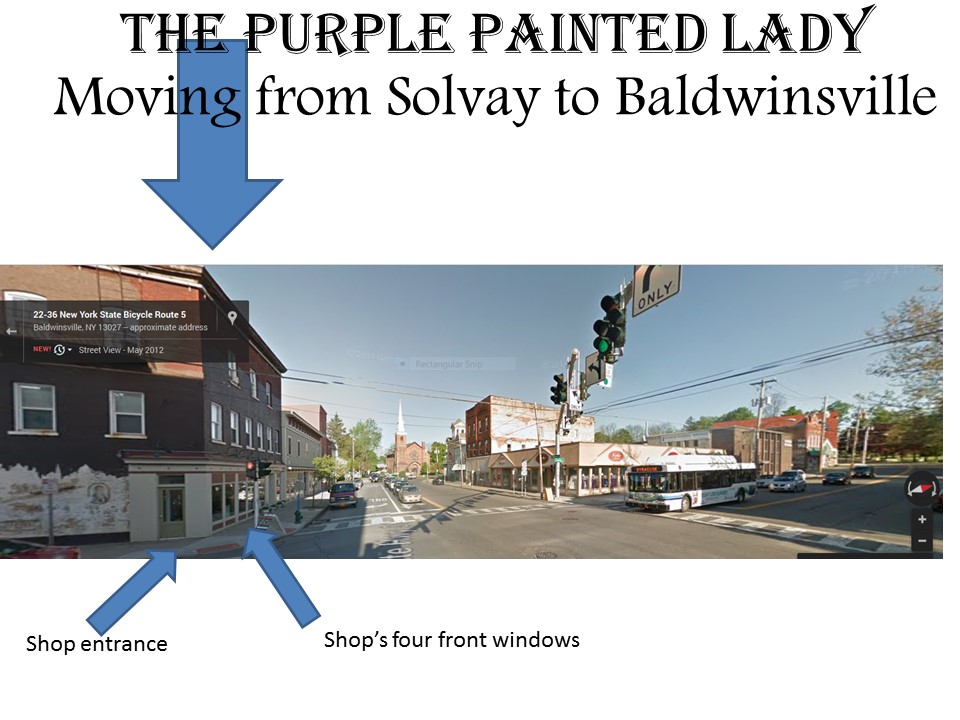
Our Syracuse, NY location as of July 1, 2014 at 1 West Genesee Street, Baldwinsville, NY 13027
Click HERE for Store hours and information.