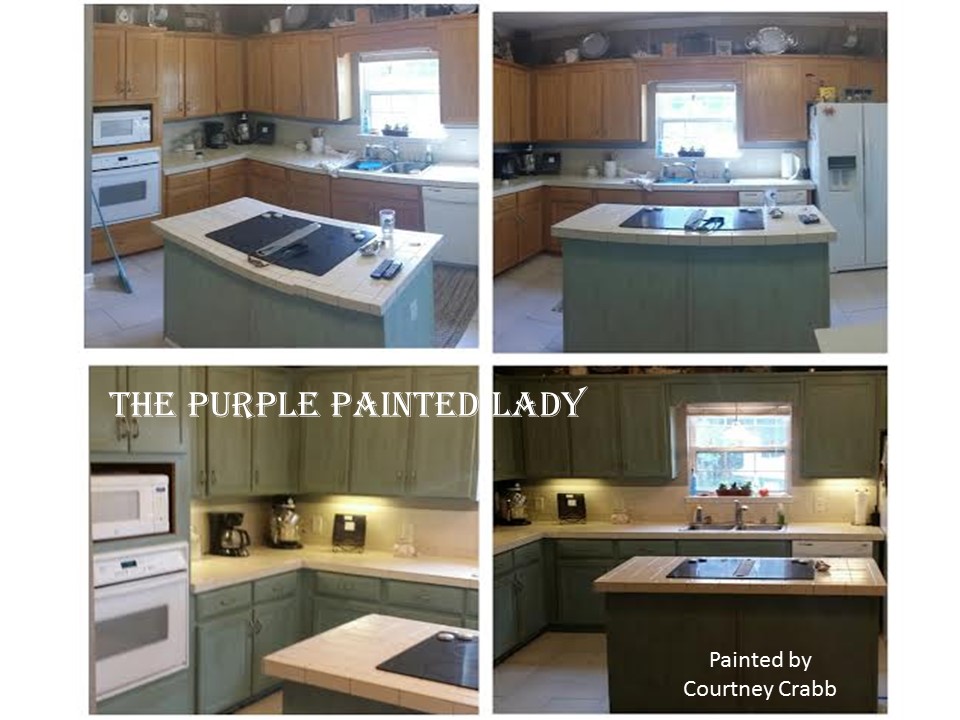
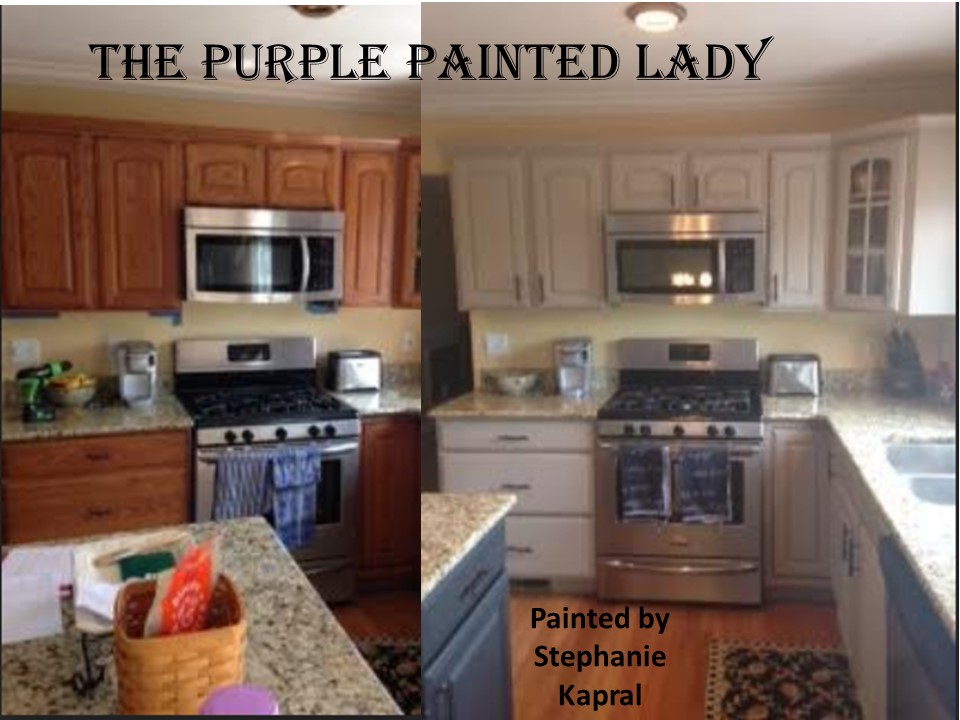
Seems like we have painted quite a few kitchens lately and I just received this question from Brenda in Ohio.
On 9/15/2012 2:09 PM, Brenda wrote:
Hi Trish -I ordered some chalk paint® and wax from you a couple of wks ago with the intent to use on my kitchen cabinets. Currently, they are that ugly orangey wood (pine, I think) with what looks like lots of poly coats. I am looking for a somewhat smooth finish – not planning to distress it at all. First, do you think this is the right paint for this job? If so, should I prime first? Should I sand it first (please say no, haha!) Can I use a roller to apply this type of paint (both for ease of painting and for a smoother finish than a brush will provide).
One more thing – is there a wax brush you can recommend besides the Annie Sloan one?
Any suggestions would be awesome! ~ Thanks! Brenda
Hey Brenda,
Thank you for choosing The Purple Painted Lady to give your business to. That is honor and we do not take it lightly. With that said- of course I do not mind helping you.
Your kitchen cabinet situation sounds like a typical scenario that Chalk Paint® would be perfect for. HOWEVER…you never mentioned what color Chalk Paint® Decorative Paint by Annie Sloan you are choosing to paint over the cabinets and I am curious of how many cabinets you are going to paint.
Here is how I would approach your specific cabinet job.
I would ……..
1. If these are not brand new cabinets- please wipe cabinets down with Mineral Spirits. I like to use the odorless spirits versus the “green” and would recommend Walmart Supercenter, Lowes or Home Depot for this. When you use the Mineral Spirits…the amount you need is not a lot- so your rag should not be dripping with Mineral Spirits. I use the analogy of nail polish remover. Take a rag and place on top of the mineral spirits and flip it over to get a few dabs of it on the rag. You want it moist, but not saturated. Hope that makes sense! Then- thoroughly wipe down the cabinets- concentrating a bit more around the handles and on the doors that are positioned in your kitchen that may get extra dirty (like near the dogs water and food dish OR near the garbage can) After wiping down the cabinets- (give it an hour for the mineral spirits to have totally evaporated) If you have filthy cabinets (sorry to insinuate anything) – but if your cabinets are well loved- and you have crud on them, use a Scotchbrite scrubbie with Mineral Spirits. These are those yellow sponges with the scratchy (abrasive) green fibers on one side.
2. I typically remove the doors and remove handle hardware (and other hinge hardware) if it is in the way when painting fronts. Leave the hardware and screws in the actual cabinet – so you know which hardware and screws go to which door. This can save you time afterward- since I had a job once where the screws were different sizes and it took forever to figure it all out during the installation part and I almost pulled out all of my hair in the process. If you have many cabinets- consider drawing on a piece of paper a layout of the kitchen and number the doors for easy installation once your painting project is completed. Number your doors and make a schematic on which door goes where. If you have an older home- this could save you a lot of frustration later when trying to rehang! (speaking from experience here)
3. I know you wrote you would rather not sand – and honestly- most likely you do not need to – but since you wrote that the cabinet has LOTS of coats of polyurethane, you may want to email me a clear – well lit photo I can confirm.) If you do sand- sand lightly using your hand with a 220 grit paper. Again- I stress- sanding lightly–and like spending 30 seconds on each door but making sure to get top to bottom and side to side …….basic coverage and sand in the same direction- not a circular motion. (Again, I am only suggesting this since I do not have a photo and you stated there are “lots of poly coats.”)
4. Since you mentioned the cabinet are very orange…..I would consider using shellac on the cabinets. (not because Chalk Paint® needs that- but since you stated they are painted orange this will prevent any of that from shadowing through- especially important if going with a light color…may not be necessary if painting with a dark color (you never mentioned the color you are going to paint them). You could always do a test door without shellac. Go ahead and paint it and see how it looks after 2 coats. If you do a test door- pick the smallest door to try it on.
Shellac in general is an excellent sealer.
I would remove the doors and use the spray shellac in a well ventilated area outside your home.
Brush the shellac over the actual cabinet boxes in your home.
Please read the post about using Shellac and please watch the “Shellac How To” video embedded in the post by clicking HERE.
5. Then go ahead and begin painting with your Chalk Paint®- most likely- 2 – 3 coats using a kitchen SPONGE Cabinet Roller (I like the Whizz brand at Lowes.) I am recommending a sponge roller since you communicated that you prefer a more smooth finish in your letter to me. (since I do not have a photo illustrating what the cabinets look like- (raise panel, etc???……I just want to mention to use a brush to cut in corners if any or to do small spots)
Note that I almost 100% of the time brush the paint on when I am doing a cabinet project.
Since you want a super smooth finish- lightly sand your paint with some 220 or UP (meaning 300 grit) sand paper and blow off any dust before beginning you begin the wax top coats. Again- this is done for a really smooth finish.
Another option for a smooth surface if using brush- is using a small amount of water with your Chalk Paint® in your final coat of chalk paint®. I do this by placing only a ¼ inch of water in a plastic cup. I dip my paint brush in the SMALL AMOUNT of water and then dip the tips of the brush into the quart of the paint. I am not gobbing my brush with paint here. This extra bit of water allows the paint to be a little thinner and smoother and it will glide on easier and you will use less paint. Every time I need more paint, I first dip my brush into the water, then the paint can.
Keep in mind when using a roller:
* You should apply uniform thin coats. Please do not think you will be further ahead applying thicker coats.
* Paint all cabinets with strokes going in the same direction- meaning either vertical or horizontal)
* Lastly- make sure to always finish the cabinet with a few clean passes as so to not have roller edge lines. The paint is self leveling- but help it by creating a smooth finish to level!
And when painting when a brush- always remember to “lay” your paint or do a finish stroke! Meaning take your brush and paint from one edge all the way to the other edge in one smooth sweep!
6. Once done with all coats of Chalk Paint® – I would use Annie’s soft wax. It was created and formulated to work perfectly with Chalk Paint®. The bulk of your project expense is the Chalk Paint® – which is well worth it since it will give you 50% greater surface coverage compared to latex. You asked specifically- if I could recommend a Wax Brush other than Annie’s. The Ultimate Wax Brush that I sell- is not an Annie Sloan Product. I carry it because I love it and I use it for ever project and as I state in my video that I recorded in June 2012…”it is worth its weight in gold.” Ultimate Wax Brushes are sold at $34.95 here on my on-line store (click here if interested in one) and sold at my shops. There are other ways to apply wax as in using your hand and a rag – but from my experience helping customers- the wax brush seems to be the tool to use to ensure success regarding uniform coverage! Please watch my video regarding “How To Apply Clear Wax” by clicking here.
Brenda- you did not provide the dimensions of your kitchen- but I would suspect based on an average job – 2 tins of clear wax would be more than enough for a kitchen.
ps I just looked at your past orders. You purchased one quart of Old White and a tin of Clear Wax…… are you using this for your cabinet? If yes- I am speculating it is a small job.
Thank you again for writing me- please let me know if this helped you!

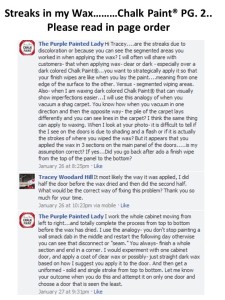
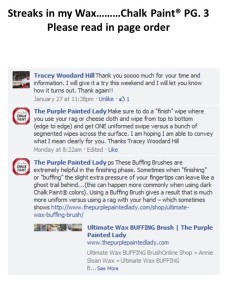
On my Facebook Page HERE– I post quite a bit of information for Chalk Paint® users. Here is one regarding preventing streaks in your paint and wax- which is very important when it comes to your kitchen cabinets!